In this chapter you will learn how to format the excel cells by using the VBA. Topics will be covered in this chapter – Number Formatting, Cell background color, Borders, Fonts, Row height, Column width, Auto fit, Alignments and wrap text.
Number Formatting
By using the VBA, we can format a number in the excel cell as percentage, time, date etc.
Below are the few examples for number formatting-
Sub Number_Formatting()

Dim sh As Worksheet

Set sh = ThisWorkbook.Sheets(1)

sh.Range("A1:A10").NumberFormat = "0.00"           'Format for Numbers"

sh.Range("B1:B10").NumberFormat = "0.00%"          'Format for Percentages"

sh.Range("C1:C10").NumberFormat = "HH:MM AM/PM"    'Format for Time"

sh.Range("D1:D10").NumberFormat = "D-MMM-YY"       'Format for Date"

sh.Range("E1:D10").NumberFormat = "$0.00"          'Format for Dollar Currency"

End Sub
Cell background color
To fill the cell background color, we must use Interior.Color or Interior.ColorIndex.
Sub Cell_Background_Color()
Dim sh As Worksheet
Set sh = ThisWorkbook.Sheets(1)
sh.Range("A1:A10").Interior.Color = vbRed
sh.Range("B1:B10").Interior.Color = vbGreen
sh.Range("C1:C10").Interior.Color = vbBlue
End Sub
There are eight colors in VBA which can be used by name- vbRed, vbBack, vbWhite,vbBlue, vbGreen, vbCyan
vbYellow and vbMagenta
We can use the RGB color code also. Below is the example.
Sub Cell_Background_Color()
Dim sh As Worksheet
Set sh = ThisWorkbook.Sheets(1)
sh.Range("A1:A10").Interior.Color = RGB(19, 40, 197)
End Sub
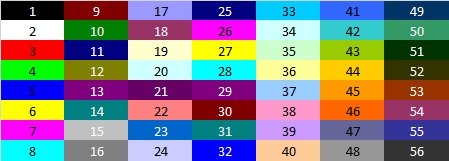
In place of color, we can use color index and give the color number. Color number can used 1 to 56.
Sub Cell_Background_Color()
Dim sh As Worksheet
Set sh = ThisWorkbook.Sheets(1)
sh.Range("A1:A10").Interior.ColorIndex = 15
End Sub
Below is the list of 56 color index.
Borders
We can apply border in a cell or range by using Borders.LineStyle property.
Sub Cell_Borders()
 Dim sh As Worksheet
 Dim i As Integer
 Set sh = ThisWorkbook.Sheets("Sheet1")
 sh.Range("A1:D20").Borders.LineStyle = xlHairline
End Sub
Fonts
To change the font color, font size and font name we can use Font property of range.
Sub Cell_Fonts()

Dim sh As Worksheet
Dim i As Integer
Set sh = ThisWorkbook.Sheets("Sheet1")

'Change the font color
sh.Range("A1:D20").Font.Color = vbBlue

'Make font bold
sh.Range("A1:D20").Font.Bold = True

'Make font Italic
sh.Range("A1:D20").Font.Italic = True

'Change the font size
sh.Range("A1:D20").Font.Size = 15

'Change the font name
sh.Range("A1:D20").Font.Name = "Arial"

End Sub
Row height
To change the row height of the cells RowHeight property is used.
Sub Row_Height()

Dim sh As Worksheet
 Dim i As Integer
 Set sh = ThisWorkbook.Sheets("Sheet1")

sh.Range("A1:D20").EntireRow.RowHeight = 25

End Sub
Column width
To change the row height of the cells RowHeight property is used.
Sub Column_Width()

Dim sh As Worksheet
 Dim i As Integer
 Set sh = ThisWorkbook.Sheets("Sheet1")

sh.Range("A1:D20").EntireColumn.ColumnWidth = 15

End Sub
Auto Fit
To auto fit a column AutoFit property is used.
Sub Column_AutoFit()

Dim sh As Worksheet
 Dim i As Integer
 Set sh = ThisWorkbook.Sheets("Sheet1")

sh.Range("A1:D20").EntireColumn.AutoFit

End Sub
Alignments
We can change the horizontal and vertical alignment of a cell or a range. HorizontalAlignment and VerticalAlignment properties are used to do so.
Sub Cell_Alignment()

Dim sh As Worksheet
Dim i As Integer
Set sh = ThisWorkbook.Sheets("Sheet1")

sh.Range("A1:D20").HorizontalAlignment = xlCenter
sh.Range("A1:D20").VerticalAlignment = xlCenter

End Sub
Warp Text
To warp the text in the cell WrapText property is used.
Sub Wrap_Text()

Dim sh As Worksheet
Dim i As Integer
Set sh = ThisWorkbook.Sheets("Sheet1")
sh.Range("A1:D20").WrapText = True
End Sub
Watch the step-by-step video tutorial:
Click here to download the practice file.