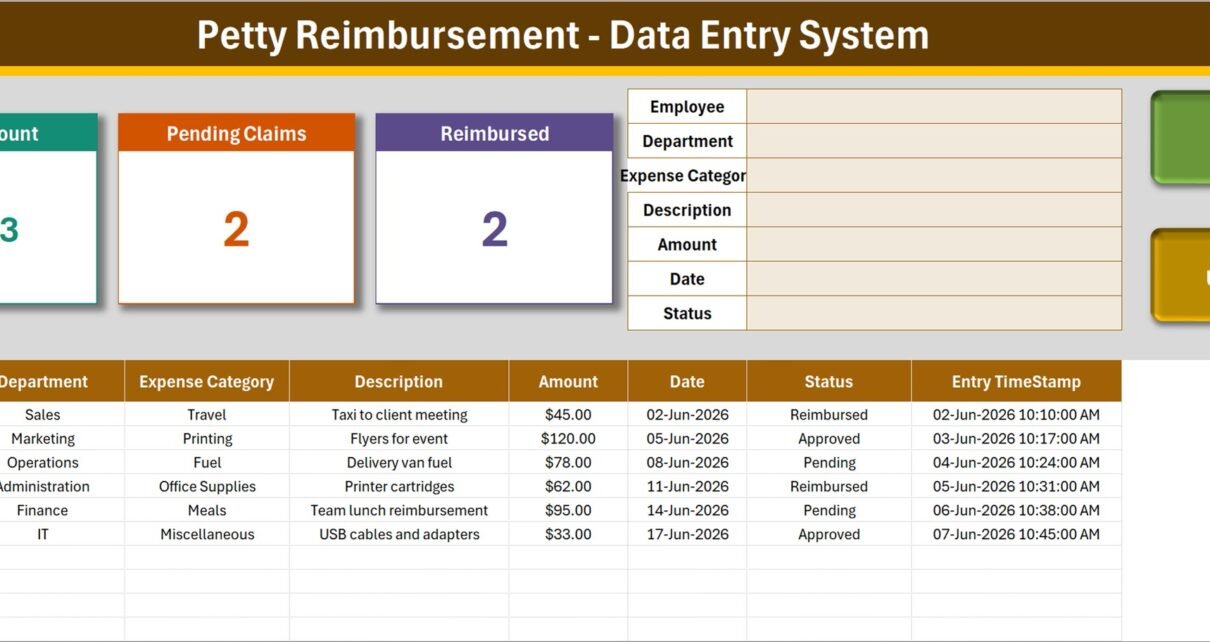
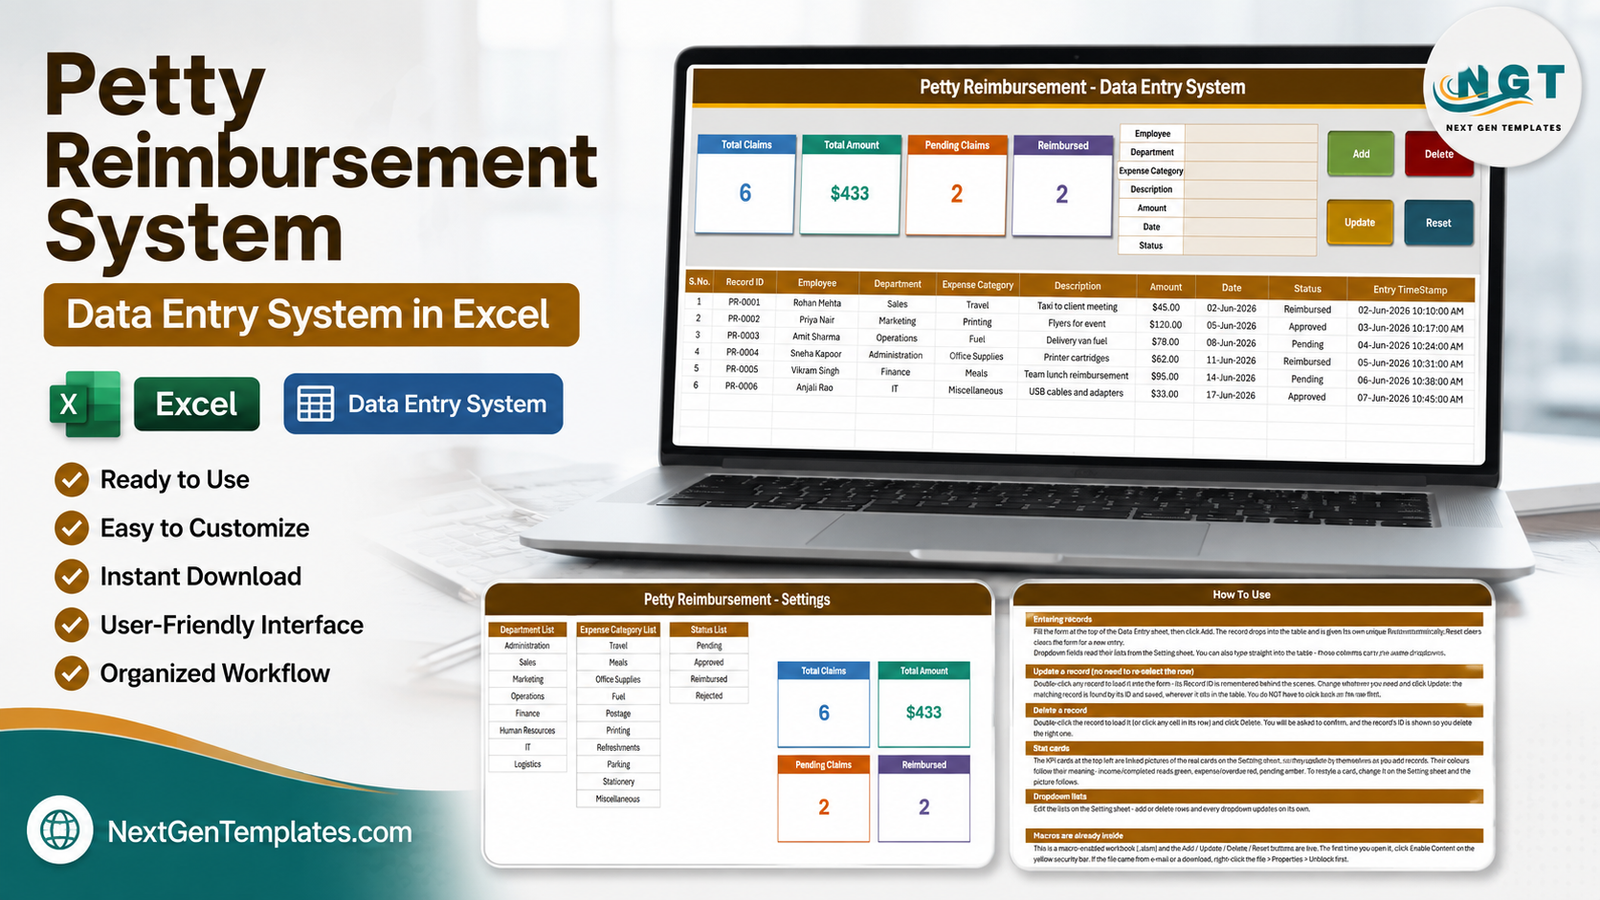
The Petty Reimbursement Data Entry System in Excel logs employee expense claims through a 7-field VBA form, tracks 4 live KPI cards, and sorts every claim into one of 4 statuses. Ten expense categories and eight departments come preloaded, the records table carries 10 columns, and each claim is issued a sequential Record ID in PR-0001 format alongside an automatic entry timestamp. Setup takes under five minutes.
Petty cash is the least glamorous money in any office and the easiest to lose track of. Somebody takes a taxi to a client meeting, somebody else buys printer cartridges, a third person picks up refreshments for a workshop – and three weeks later nobody can say who has been paid back and who is still waiting. This template replaces the paper petty cash book and the ad-hoc spreadsheet with a proper form-driven log that records every claim, categorises it, and shows what is still outstanding.
Before anything else, one practical note. This is a macro-enabled workbook (.xlsm) built for desktop Microsoft Excel on Windows or Mac. The Add, Update, Delete and Reset buttons are VBA macros, so you must click Enable Content the first time you open the file. Excel for the web and Google Sheets do not run VBA and the buttons will do nothing there. Microsoft’s own guide to enabling or disabling macros in Microsoft 365 files covers the security bar in detail. Every number in the screenshots below is sample data.
Key Features of the Petty Reimbursement Data Entry System in Excel
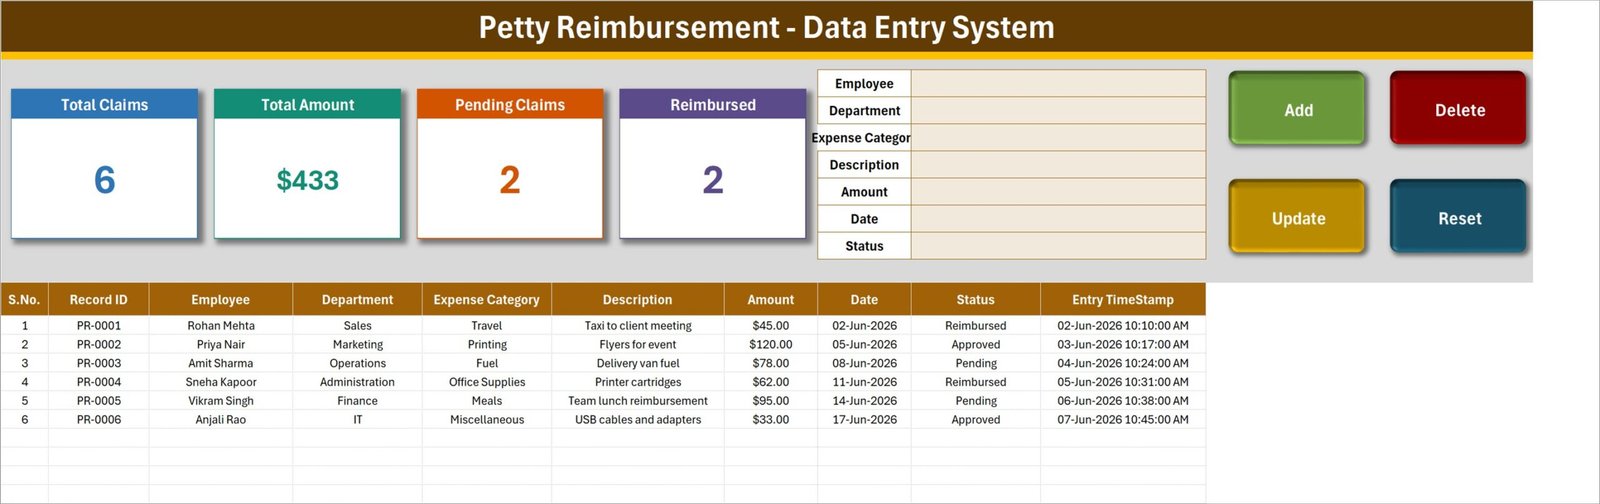
- A seven-field claim form. Employee, Department, Expense Category, Description, Amount, Date and Status sit in one block at the top of the Data Entry sheet, with the four action buttons beside them.
- Four VBA buttons that actually do the work. Add writes the claim to the table, Update saves an edit back to the right record, Delete removes one after a confirmation, and Reset clears the form for the next entry.
- Four live KPI cards. Total Claims, Total Amount, Pending Claims and Reimbursed recalculate as records are added. They are linked pictures of master cards on the Setting sheet, so restyling them in one place restyles them everywhere.
- Automatic Record IDs and timestamps. Every claim receives a sequential ID such as PR-0001 plus an Entry TimeStamp column, which is what makes a duplicated receipt easy to spot.
- Ten expense categories preloaded: Travel, Meals, Office Supplies, Fuel, Postage, Printing, Refreshments, Parking, Stationery and Miscellaneous.
- Eight departments preloaded: Administration, Sales, Marketing, Operations, Finance, Human Resources, IT and Logistics.
- A four-stage status flow: Pending, Approved, Reimbursed and Rejected.
- Editable dropdowns. Every list lives on the Setting sheet. Add or delete rows and the form dropdowns follow on their own – no formulas to rewrite.
Sheets Explanation
The workbook ships with four sheets. Three are shown below; the fourth, Get More Templates, is a short links page pointing at the wider NextGenTemplates library.
Sheet 1: Data Entry
This is the screen you will live in. The four KPI cards run along the top left, the claim form sits to their right, and the Add, Delete, Update and Reset buttons are stacked on the far right. Beneath them the records table holds ten columns – S.No., Record ID, Employee, Department, Expense Category, Description, Amount, Date, Status and Entry TimeStamp – and grows downward as claims are logged.
Sheet 2: Setting
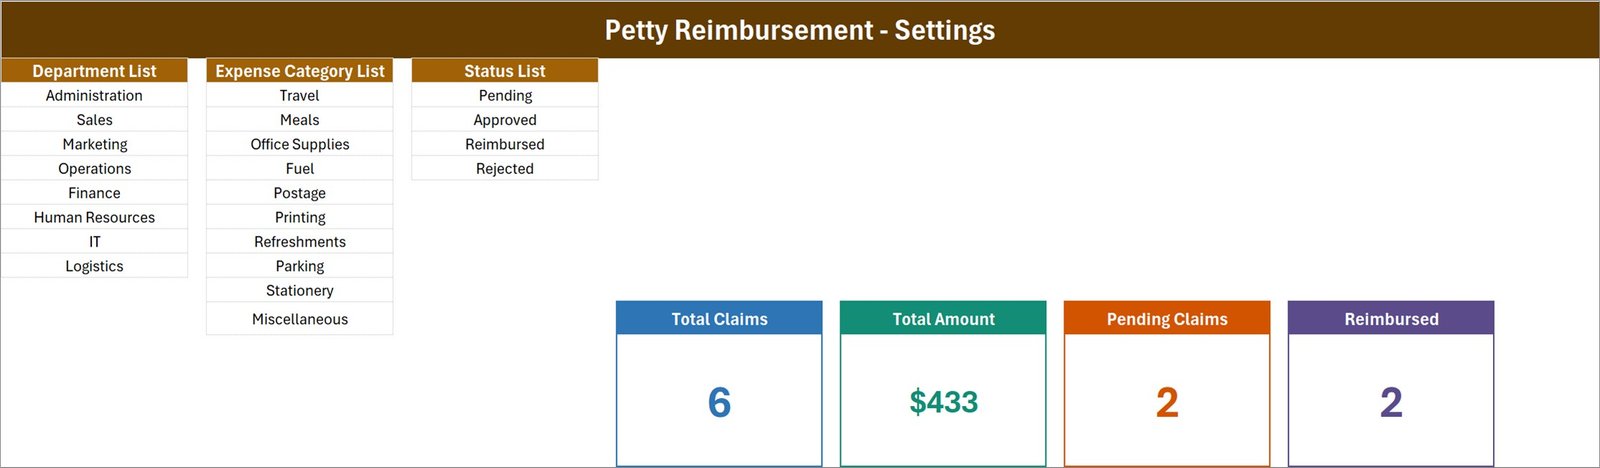
Three master lists drive the form: Department List with eight entries, Expense Category List with ten, and Status List with Pending, Approved, Reimbursed and Rejected. The four master KPI cards also live here – the cards on the Data Entry sheet are linked pictures of these, which is why a colour change made once shows up in both places.
Sheet 3: Instructions (How To Use)
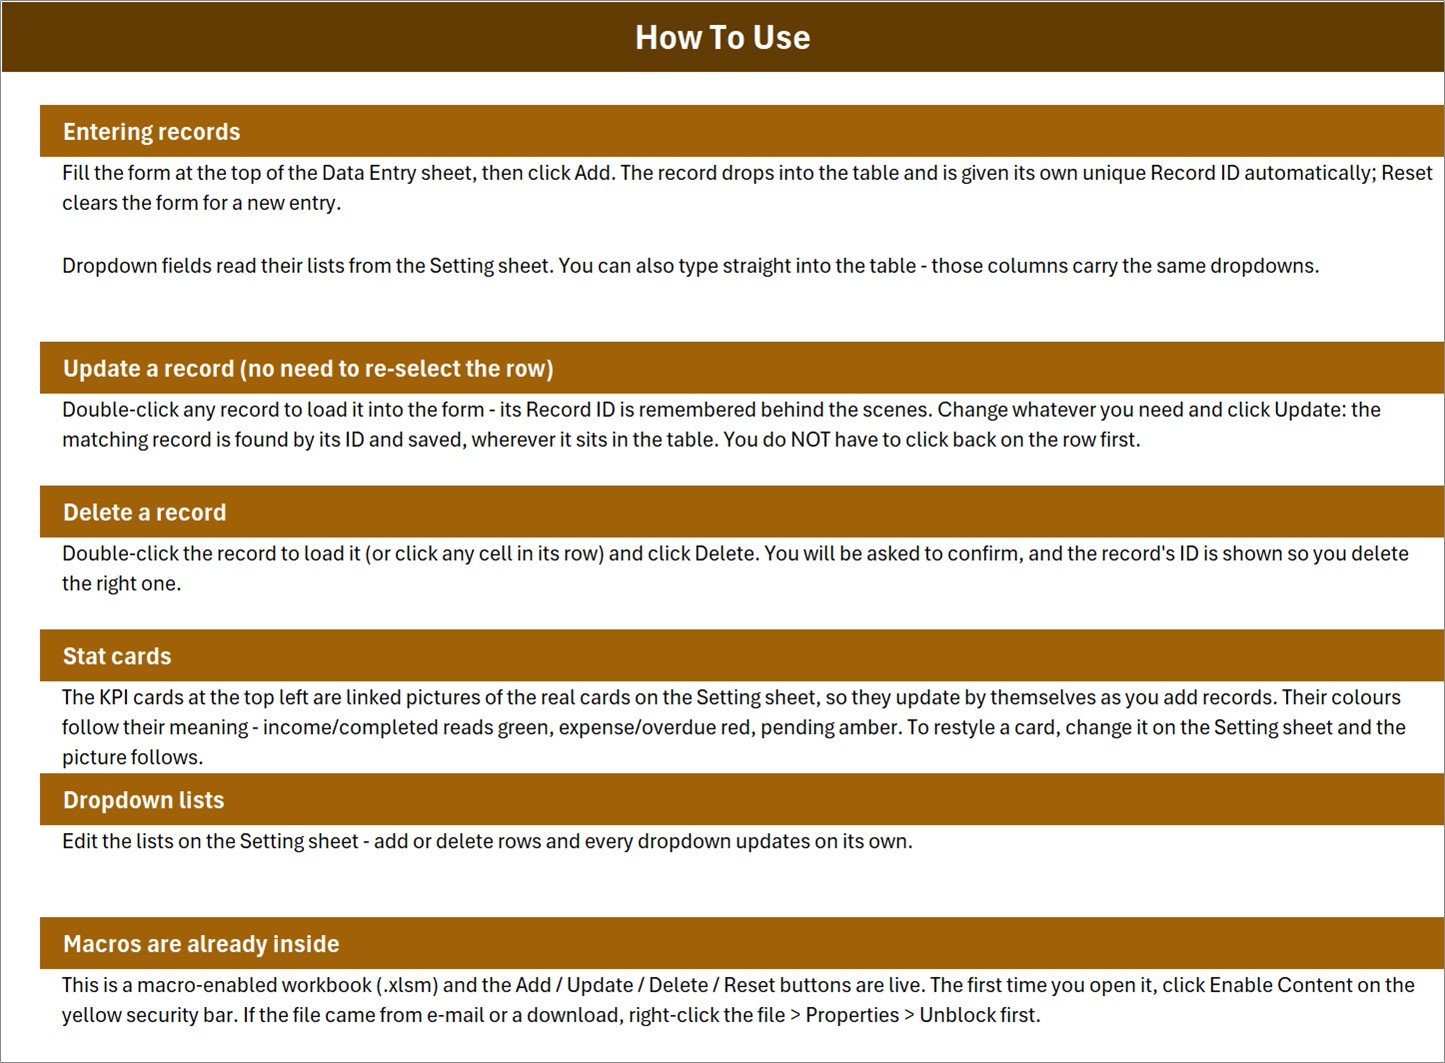
A six-section guide built into the workbook itself: entering records, updating a record without re-selecting its row, deleting with an ID confirmation, how the stat cards work, editing the dropdown lists, and enabling macros on first open. No separate PDF manual to lose.
Petty Reimbursement Data Entry System vs. a Google Sheets Expense Form vs. Expensify / Zoho Expense – Feature Comparison
| Feature | Petty Reimbursement Data Entry System in Excel | Google Sheets expense form | Expensify / Zoho Expense |
|---|---|---|---|
| Cost | $6.99 one-time | Free, but you build it | $5-20 per user per month |
| Platform | Desktop Excel (.xlsm) | Browser, any device | Browser and mobile app |
| Setup time | Under 5 minutes | 2-4 hours to build from scratch | 1-2 days plus policy configuration |
| Add / Update / Delete buttons | Built in as VBA macros | Apps Script you write yourself | Included |
| Automatic record ID and timestamp | Yes, PR-0001 format | Formula workaround | Included |
| Works offline | Yes | Limited | No |
| Real-time team collaboration | No – single-file workbook | Yes | Yes |
| Receipt photo capture | No | No | Yes |
| Year-1 cost at 5 users | $6.99 total | $0 plus your build time | $300-1,200 |
For a small office that just needs its petty cash claims logged, categorised and marked reimbursed – without paying per person every month – the Petty Reimbursement Data Entry System in Excel sits in the sweet spot.
Who Should Use This Template
Perfect for:
- Office administrators and finance assistants at 5-100 person companies still running petty cash on paper
- Small business owners who reimburse staff for taxi fares, fuel, printing and office supplies from a cash float
- School, clinic and NGO administrators who need a claim log with a visible approved / reimbursed status
- Anyone comfortable in desktop Excel who prefers a form to typing straight into raw rows
Not a fit if:
- Several people need to enter claims at the same time – this is a single workbook, not a shared database
- You only have Excel for the web or work in Google Sheets, where the VBA buttons will not run
- You need receipt photo capture, corporate card feeds, mileage GPS or e-mail approval routing
- You are looking for built-in tax treatment or statutory reporting – this template records and reports your own figures and makes no accounting judgements
Real-World Use Cases
Meera runs the front office at a 25-person design studio. Her team pays for taxis, couriers and coffee runs out of pocket and hands her a pile of receipts every week. She logs each claim against the person and their department, leaves it Pending until her manager signs off, then flips it to Reimbursed on payout day. The Pending Claims card tells her at a glance how much cash she still owes the team – a number she previously had to reconstruct by hand.
Daniel manages a small chain of three clinics. Each site e-mails him fuel, printing and refreshment claims weekly. Because every claim carries a Record ID and a timestamp, a receipt submitted twice stands out immediately, and the Total Amount card gives him a running monthly figure without building a single pivot table.
Priya administers a community NGO with a modest cash float. She uses the Expense Category List to split spending across Travel, Postage, Stationery and Miscellaneous, then filters the records table by category when the committee asks where the float went last quarter. Because the list is editable, she added two categories of her own in about thirty seconds.
Advantages of the Petty Reimbursement Data Entry System in Excel
It costs once. At $6.99 the template is roughly what a single seat on an expense SaaS platform costs for one month. A five-person team would spend $300-1,200 in the first year on a subscription tool; here the year-one cost is the purchase price and nothing more.
It removes the duplicate-payment problem. Sequential Record IDs and entry timestamps mean a claim can be traced back to the moment it was logged. That single feature is usually what pushes an office off paper.
It is faster than typing into rows. Because the form is dropdown-driven, department and category spellings stay consistent, which in turn makes filtering and totalling reliable. Double-clicking a claim loads it back into the form with its ID remembered, so corrections take seconds and cannot land on the wrong row.
It works with no internet connection. Field offices, sites with patchy connectivity and anyone who simply prefers a local file can log claims without waiting on a server.
Opportunities for Improvement
An honest look at the limits. This is a single-file workbook, so two people cannot enter claims simultaneously – if your office needs concurrent entry, a Google Sheets or web-app build is the better shape. There is no receipt image capture; you will still keep the paper or a scanned folder alongside it. There is no approval workflow in the software sense – the Status column records a decision, but it does not route anything for sign-off or send notifications. And because the automation is VBA, the template is tied to desktop Excel; opening it in a browser gives you the data but not the buttons. Finally, the workbook reports the figures you type and nothing more – it performs no tax calculation and offers no accounting or compliance guidance.
Best Practices
- Set up the Setting sheet first. Match the Department List and Expense Category List to your own organisation before logging a single claim, so your historic data is consistent from day one.
- Delete the six sample rows once you have looked at them, so your totals start from zero.
- Log the claim on the day you receive the receipt. The entry timestamp is only useful if it reflects reality.
- Use Rejected rather than deleting. A rejected claim that stays in the log is a record of a decision; a deleted one invites the same receipt to come back next month.
- Keep a dated backup copy monthly. A single .xlsm file is easy to copy – do it before any big edit to the Setting sheet.
- Keep the receipts. The workbook is your index, not your evidence.
Explore Relevant Templates
- Pocket Money Log Data Entry System in Excel – the same form-and-KPI build applied to personal cash spending. There is a full write-up of it on this blog.
- Employee Document Data Entry System in Excel – keeps staff paperwork and expiry dates in the same style of workbook; see the detailed post here.
- Class Schedule Data Entry System in Excel – another VBA entry system from the same family, covered in full here.
- Tax Deduction and Receipt Tracker in Google Sheets – a browser-based alternative when several people need access at once.
- New in the same line: Bar Stock Register, Gift Register, Supplement Sales and Livestock Register Data Entry Systems in Excel.
Frequently Asked Questions
Do I need to enable macros to use the Petty Reimbursement Data Entry System in Excel?
Yes. The Petty Reimbursement Data Entry System in Excel is a macro-enabled .xlsm workbook and the Add, Update, Delete and Reset buttons are VBA macros. Click Enable Content on the yellow security bar the first time you open it. If you downloaded the file, right-click it, choose Properties and tick Unblock first.
Will the Petty Reimbursement Data Entry System work in Google Sheets?
No. Neither Google Sheets nor Excel for the web runs VBA, so the four buttons in the Petty Reimbursement Data Entry System in Excel will not function there. Desktop Microsoft Excel on Windows or Mac is required. The sheets still open and the data reads fine, but the form automation stays inactive.
How many claims can the template hold?
There is no built-in limit in the Petty Reimbursement Data Entry System in Excel. The records table grows down the sheet as claims are added and is bounded only by Excel itself, which allows over one million rows per worksheet. Ordinary petty cash volumes come nowhere near that.
Can I add my own departments and expense categories?
Yes. Open the Setting sheet in the Petty Reimbursement Data Entry System in Excel and edit the Department List, Expense Category List or Status List. Add or remove rows and every dropdown on the entry form updates automatically, with no formulas or macro code to touch.
How long does setup take?
Under five minutes. Unzip the Petty Reimbursement Data Entry System in Excel, enable macros, edit the three lists on the Setting sheet, delete the six sample rows and you are logging live claims. There is no account to create and no data to import.
How does this compare to Expensify or Zoho Expense?
Expensify and Zoho Expense add receipt photo capture, card feeds and multi-step approval routing for roughly $5-20 per user per month. The Petty Reimbursement Data Entry System in Excel costs $6.99 once, runs offline and needs no accounts – but it is a single-file log rather than a collaborative platform.
Does the template handle tax or accounting entries?
No. The Petty Reimbursement Data Entry System in Excel records and reports the claim figures you enter – amounts, categories, departments and statuses. It performs no tax calculations and makes no accounting or compliance judgements. Confirm the treatment of any expense with your own accountant.
About the Author
Built by PK – Microsoft Certified Professional with 15+ years of Excel, Google Sheets and Power BI experience. Founder of NextGenTemplates, reaching 300K+ subscribers across YouTube channels. Every template is hand-built and tested before release.
Conclusion
Petty cash does not need an enterprise platform. It needs a log that nobody can argue with: who spent it, on what, when it was recorded, and whether it has been paid back. The Petty Reimbursement Data Entry System in Excel gives you that in a single workbook – a seven-field form, four working buttons, four live KPI cards, ten categories, eight departments and a four-stage status flow – for the price of one month of one seat on a subscription tool.
👉 Click here to Purchase the Petty Reimbursement Data Entry System in Excel
Instant download · One-time payment · No subscription · Lifetime access. Remember it is a desktop Excel workbook and macros must be enabled for the buttons to run.
🎥 For step-by-step video walkthroughs, visit Youtube.com/@PK-AnExcelExpert.
Last updated: August 2026