You run meetings. People share ideas, raise concerns, and agree on next steps. Yet, after the meeting, feedback sits in scattered notes and inboxes. As a result, you miss patterns, you repeat mistakes, and you lose time hunting for insights. You can fix all of that with a Meeting Feedback Tracker in Excel. This guide shows you how the tracker works, why it beats ad-hoc surveys, and how you can set it up fast—even if you don’t write code. I also include advantages, best practices, and a detailed FAQ to keep you moving.
What Is a Meeting Feedback Tracker in Excel?
A Meeting Feedback Tracker in Excel captures, organizes, and analyzes feedback after any meeting—town halls, client reviews, sprint retros, training sessions, or 1:1 check-ins. You log each response, rate the experience, tag the theme, and then view clean charts on a dashboard. Because the tool runs on Excel with a light layer of VBA, you get a familiar interface, quick data entry, and instant refresh of the dashboard.
Click to Purchases Meeting Feedback Tracker in Excel
What you get at a glance
-
A secure login form with role-based access
-
A clean main form to manage everything in one place
-
A dashboard with slicers and charts that update with one click
-
A data entry sheet with Add, Update, and Delete buttons
-
A Manage List sheet to control every dropdown
-
A Support sheet with pivot tables that feed the visuals
-
A User Management panel to add or edit users
-
A Settings sheet for quick customizations
Why Choose Excel (and a bit of VBA) for Meeting Feedback?
You already use Excel. Your team knows it. Because of that, you can deploy an Excel-based tracker in minutes, not weeks. You also avoid long approvals for new software. Meanwhile, VBA adds small touches—forms, buttons, and automation—without heavy development.
You benefit because:
-
Speed: Start today. Import past feedback in minutes.
-
Control: Edit lists, add fields, and tweak formulas without a developer.
-
Clarity: Pivot tables and slicers give instant insight.
-
Cost: No new licenses for most organizations.
-
Portability: Share a single file. Store it on OneDrive or SharePoint for easy access.
How Does the Tool Work? A Feature-by-Feature Walkthrough
You shared your initial notes on the tool. I polished them and expanded every part below so you can use it without guesswork.
Login Form — How Do You Control Access?
When you open the workbook, a Login Form appears. Enter the sample credentials to try it:
-
User ID:
Admin1 -
Password:
abcd
Then hit Login or press Enter. You land on the Main Form.
Pro tips
-
Change the default password on first use.
-
Create separate roles (Admin, Approver, User, Viewer) in User Management.
-
Map features to roles: only Admins delete records or change lists.
Main Form — What Can You Manage in One Place?
The Main Form acts as your control room. You can:
-
Open Data Entry to add or edit feedback
-
Jump to the Dashboard
-
Open Manage List to maintain dropdown values
-
Launch User Management
-
Visit Settings for global options
-
Log out or switch user accounts
Because everything sits one click away, you spend time on analysis, not navigation.
Dashboard Sheet — What Insights Do You See Instantly?
The Dashboard shows your results with slicers and charts. You filter by date, department, meeting type, mode, or location, and the visuals respond right away. You can tailor the exact visuals, but a strong default set includes:
Slicers (example set of 8):
-
Date, Month, Department, Meeting Type, Mode (Online/Offline/Hybrid), Location, Stakeholder Type, Feedback Category
Charts and KPIs (example set):
-
# of Feedback by Status (New, In Review, Closed)
-
Avg. Rating by Department
-
Avg. Rating by Meeting Type
-
Avg. Rating by Mode
-
Avg. Rating by Location
-
Avg. Rating by Stakeholder Type
-
Confidentiality Mix (Public / Anonymous / Confidential)
-
Monthly Trend of Avg. Rating (line chart)
Because the dashboard runs on pivot tables, you refresh it in one step. The tracker does that refresh automatically after each Submit from the data form.
Note: Your original notes referenced “# of Incidents by Severity.” I replaced that with meeting feedback-focused visuals to match the real goal of the tool.
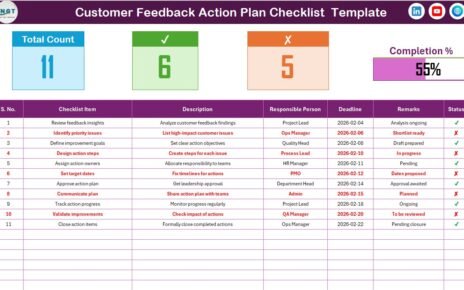
Data Entry Sheet — How Do You Capture Feedback Fast?
Open the Data Entry sheet. At the top, you see three buttons:
-
Add New Record — Opens a form with clean inputs and dropdowns
Update Record
- Click the ID of an existing row, hit Update, and the form loads with prefilled fields
-
Delete Record — Select the ID, hit Delete, and confirm the action
Form fields you’ll likely include
-
Feedback ID (auto)
-
Meeting Title
-
Meeting Date and Time
-
Department / Team
-
Meeting Type (Town Hall, Review, Retro, Training, etc.)
-
Stakeholder Type (Employee, Manager, Client, Vendor, etc.)
-
Mode (Online, Offline, Hybrid)
-
Location (City / Site / Room)
-
Rating (1–5)
-
Feedback Category (Content, Facilitation, Time, Logistics, Tools, Q&A, etc.)
-
Comment / Suggestion
-
Confidentiality (Public, Anonymous, Confidential)
-
Status (New, In Review, Closed)
-
Approver and Approval Status (Approved, Rejected, Pending)
-
Updated By and Timestamp (auto-capture)
Because the Manage List sheet controls every dropdown, you keep entry clean and consistent.
Click to Purchases Meeting Feedback Tracker in Excel
Manage List Sheet — How Do You Keep Dropdowns Clean?
Open Manage List. You will see tables for each dropdown:
-
Departments
-
Meeting Types
-
Stakeholder Types
-
Modes
-
Locations
-
Feedback Categories
-
Approval Statuses
-
Status values
Use the Add and Delete buttons beside each list. The form updates those lists, and the data entry dropdowns pick them up immediately. You keep language consistent across the workbook.
Support Sheet — What Powers the Charts?
The Support sheet hosts pivot tables and helper ranges. The dashboard reads from here. You do not need to change anything on this sheet. You can even hide it to keep the file tidy.
User Management — How Do You Add Users and Reset Passwords?
Click User Management from the Main Form. You can:
-
Add a user with a role (Admin, Approver, User, Viewer)
-
Update names, emails, or roles
-
Reset passwords
-
Deactivate users who leave the team
Because you keep users inside the workbook, you avoid external dependencies. You also keep access aligned with your process.
Settings Sheet — What Can You Customize in Seconds?
Use Settings to change global options:
-
Default rating scale (1–5 or 1–10)
-
Default approval workflow (who reviews, who closes)
-
Anonymity rules (allow anonymous? require comments? limit viewer access?)
-
Dashboard refresh behavior (auto after submit, or manual refresh)
-
File protection options (sheet locks, hidden tabs, protected ranges)
Login With Different Users — How Do Roles Change the Experience?
You can log in with an Admin account to manage users and lists. Then you can switch to a User account to mimic day-to-day entry. Because roles drive what you see, you reduce mistakes and keep governance tight.
What Data Should You Track in a Meeting Feedback Tracker?
You track enough to analyze patterns without making forms heavy. Use this set as a strong start:
-
Meeting basics: Title, Date, Time, Organizer, Department
-
Context: Meeting Type, Stakeholder Type, Mode, Location
-
Feedback tags: Category, Confidentiality, Status, Approval Status
-
Scores: Overall Rating, Optionally NPS (0–10), or separate sub-ratings (Content, Clarity, Facilitation)
-
Text: Comment / Suggestion, Follow-up Action
-
Ops: Updated By, Timestamp, Record Owner
Because you keep fields consistent across meetings, your charts stay clean.
How Do You Set It Up in 15 Minutes?
Follow these steps and you’ll have a working tracker fast.
-
Enable macros. Open Excel, go to Options → Trust Center → Trust Center Settings → Macro Settings, and allow macros.
-
Open the file. The Login Form pops up. Enter the sample Admin credentials.
-
Change the Admin password. Go to User Management and set a strong one.
-
Load your lists. Open Manage List and add Departments, Meeting Types, and Feedback Categories.
-
Test data entry. Click Add New Record, fill in a few rows, and submit.
-
Check the dashboard. Visit Dashboard and confirm charts refresh.
-
Set roles. In User Management, add Users, Approvers, and Viewers.
-
Review Settings. Adjust the rating scale, anonymity, and refresh preferences.
-
Save to OneDrive or SharePoint. You improve availability and version control.
-
Document the process. Add a short “How to use” sheet or README for your team.
How Do You Analyze the Feedback?
You want trends, not noise. Use this flow:
-
Start with volume. Check # of Feedback by Status to see response levels and workload.
-
Check satisfaction by segment. Look at Avg. Rating by Department, Meeting Type, and Mode.
-
Find pain points by category. Review Feedback Category bars and sort descending.
-
Watch the trend. Use a monthly line chart for Avg. Rating or NPS.
-
Drill into comments. Filter by a low-rated segment and read comments to see the “why.”
-
Create actions. Convert low-rated patterns into clear action items with owners and due dates.
-
Close the loop. Mark items as Closed when you implement fixes, then watch the next month’s rating.
Where Can You Use This Tracker? (Real-World Cases)
-
HR Town Halls: Measure clarity, fairness, and time for Q&A.
-
Leadership All-Hands: Track content usefulness and pacing.
-
Sprint Retros: Capture team sentiment and bottlenecks.
-
Training Sessions: Rate trainer skill, content quality, and logistics.
-
Client Reviews: Track relationship health and account risks.
-
Onboarding Meetings: Improve early experience for new hires.
-
Vendor Briefings: Measure clarity and technical depth.
Because the tracker lives in Excel, you can copy the file per program, per region, or per quarter.
Advantages of Meeting Feedback Tracker in Excel
-
Fast rollout: You deploy in hours, not weeks.
-
Zero friction: Your team already knows Excel.
-
Strong governance: Roles and login keep access tight.
-
Clean data: Dropdown lists keep labels consistent.
-
Live insights: Slicers and charts update right away.
-
Easy change: You add fields, change scales, and extend logic anytime.
-
Low cost: You avoid new tools and complex approvals.
-
Portable: You share one file or publish to SharePoint.
Best Practices for the Meeting Feedback Tracker
-
Collect feedback within 24–48 hours. People remember details and write better notes.
-
Keep forms short. Aim for one screen—five minutes or less.
-
Allow anonymity when needed. You get more honest answers.
-
Tag feedback well. Train owners to pick the right category every time.
-
Calibrate rating scales. Define what 1, 3, and 5 mean with short examples.
-
Lock formulas and IDs. Protect sheets and hide support tabs.
-
Refresh the dashboard often. Turn on auto-refresh after each submit.
-
Archive quarterly. Copy the file with a quarter tag and trim old records.
-
Back up weekly. Store a copy in a safe location.
-
Track actions. Add an “Action Taken” column to close the loop.
-
Review roles. Limit delete rights to Admins only.
-
Document changes. Keep a simple “Changelog” sheet.
Common Mistakes and How to Avoid Them
-
Too many fields: People stop responding. Start lean.
-
Messy lists: You get “Sales,” “sales,” and “Sales Team” as three values. Maintain lists.
-
No owner: Feedback sits idle. Assign each item to someone.
-
No timeline: Actions drift. Add due dates and check weekly.
-
Hidden formulas unlocked: Users overwrite logic. Lock and protect sheets.
-
Manual refresh confusion: Turn on auto-refresh or add a clear Refresh button.
-
Weak security: Change default passwords, limit Admin rights, and store files in trusted locations.
Troubleshooting: Quick Wins
-
The login does not appear: Confirm macros are enabled.
-
Slicers don’t filter: Refresh all pivots, then reconnect slicers.
-
Charts don’t update: Check that the pivot caches refresh after submit (VBA event).
-
Dropdown shows wrong values: Review Manage List and remove duplicates.
-
Delete button fails: Ensure you select an ID and confirm the prompt.
-
User can’t see buttons: Verify the user’s role and sheet protection settings.
-
Slow file: Limit volatile formulas and reduce image sizes. Consider a yearly archive.
Implementation Tips for Teams
-
Single-user editing: Excel locks a file when someone opens it for editing. Keep one editor at a time for the main file.
-
Shared intake: If you need many respondents, consider a simple Microsoft Form or Google Form. Then import responses into Excel and refresh the dashboard.
-
Version control: Save the master on OneDrive or SharePoint. Use file version history.
-
Training: Host a 30-minute walkthrough. Show how to add records, filter slicers, and read charts.
Sample KPIs to Track with the Dashboard
-
Response Rate (%): Responses / Invitees
-
Average Rating: 1–5 or 1–10 scale
-
Low-Score Rate (%): % of ratings ≤ 2 (or ≤ 6 on NPS-style)
-
Top Categories by Volume: The five most frequent tags
-
Time to Close (days): Average days to move New → Closed
-
Follow-Up Completion (%): Closed items / Total items
-
Trend of Avg. Rating: Last 6–12 months
Because these metrics appear on cards and simple charts, your team understands them fast.
How Do You Keep the Data Clean Over Time?
-
Standardize labels. Manage Lists centrally.
-
Use data validation. Force dropdowns for every categorical field.
-
Auto-generate IDs. Build an incremental ID (e.g.,
FBK-000345). -
Timestamp actions. Capture Updated By and Timestamp in VBA.
-
Audit changes. Optional: log old vs. new values on a hidden sheet.
Can You Extend the Tracker Later?
Absolutely. You can add:
-
Action Register: A dedicated sheet with owner, due date, and status.
-
Email reminders: VBA to notify owners when due dates approach.
-
NPS field: Add 0–10 with promoter/detractor logic.
-
Power BI output: Push a CSV export for a broader analytics view.
-
Department-specific forms: Pre-filtered forms per team.
-
Language packs: Manage labels in a Settings table and switch language.
Conclusion
You can transform meetings with a simple, powerful Meeting Feedback Tracker in Excel. You collect feedback fast, tag it well, and turn it into action. Because the workbook adds a login form, clean lists, a tight dashboard, and role-based control, you keep data safe and useful. Now you can improve meetings every month, show progress with proof, and build a culture that listens—and acts.
Frequently Asked Questions (FAQs)
How do I enable macros to use the tracker?
Open Excel → Options → Trust Center → Trust Center Settings → Macro Settings → choose Enable VBA macros in a trusted environment. Then reopen the file and log in.
Can multiple users work at the same time?
Excel allows one editor at a time for a single workbook. You can store the file on OneDrive or SharePoint and let people take turns. If you expect many respondents, collect feedback through a simple form, then import the results into the tracker.
How do I change the default Admin password?
Log in with the Admin account, open User Management, select the Admin user, and set a new password. Save the file. Share the new password with authorized people only.
Can I add or remove fields from the data form?
Yes. Add columns on the Data Entry table and update the form controls in VBA to map new fields. Update Manage List if the new field uses a dropdown. Refresh pivots after changes.
How do I prevent accidental changes to formulas?
Protect formula cells and lock the Support sheet. Keep the Support sheet hidden. Store the file in a trusted location and limit Admin rights.
What ratings should I use—1–5 or 1–10?
Use 1–5 for speed and clarity. Teams understand five-point scales quickly. If you need finer detail, switch to 1–10 in Settings and adjust card calculations.
How do I keep categories consistent across teams?
Use the Manage List sheet. Review and prune values monthly. Merge duplicates and keep names short and clear. Train users to pick the right category every time.
Can I analyze only a specific period or team?
Yes. Use the Date and Department slicers on the dashboard. You can also add a Quarter or Year slicer if you want quick time filters.
How do I import historical feedback?
Paste prior records into the Data Entry table with clean columns. Ensure unique IDs. Then refresh pivots. The dashboard picks everything up.
Can I send email alerts when someone submits low scores?
Yes, with a small VBA routine. Trigger an email when Rating ≤ threshold or when Status = New. Use Outlook automation if your environment allows it.
How do I close the loop on feedback?
Add an Action Taken column and an Owner column. Review new items weekly. Set due dates. Once done, change Status to Closed. Track Time to Close as a KPI.
Will the tracker work on Mac?
Yes, but test your VBA components. Some Outlook automations or API calls differ on Mac. Keep forms and pivot features simple for cross-platform use.
How do I handle anonymous feedback?
Enable Anonymous in Manage List → Confidentiality. Hide the Name or Email fields for anonymous entries. Limit who can view confidential comments through roles.
What if charts stop updating?
Refresh all pivots. Confirm the dashboard charts point to the correct pivot caches. Check the Submit code to ensure it calls a refresh routine after every record change.
Visit our YouTube channel to learn step-by-step video tutorials