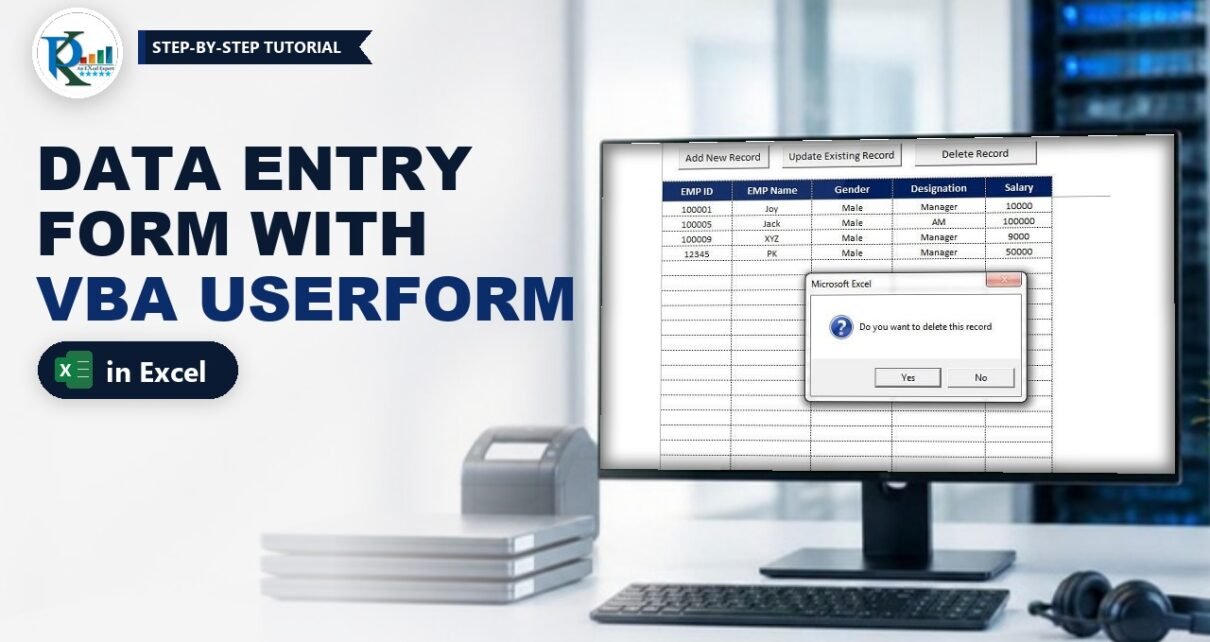
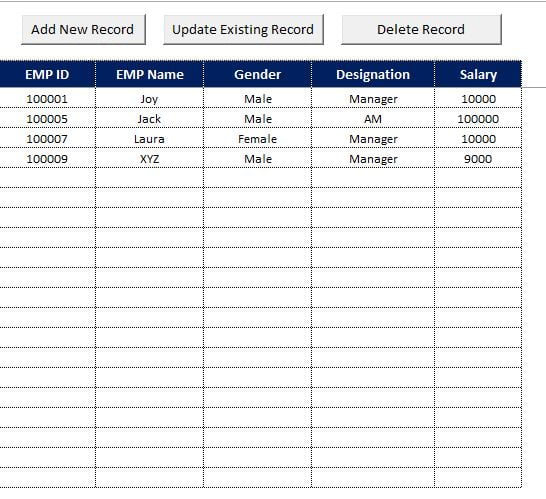
A data entry form in Excel lets users add, update and delete records through a clean pop-up window instead of typing straight into the sheet. In this tutorial you build one with VBA UserForms for a simple employee list: EMP ID, EMP Name, Gender, Designation and Salary. The sheet stays protected, so nobody can change the data by hand, and every entry is checked before it is saved: numeric IDs, no blank names, a gender and designation picked, a numeric salary and no duplicate IDs.
Watch the Video Tutorial
The form is built in three parts: Part 1 designs the UserForm, Part 2 adds the validation and the code that saves a new record, and Part 3 creates the Update form and the Delete button.
What You Will Build
- An Add New Record form with text boxes, Male/Female option buttons and a Designation drop-down.
- Five validation checks plus a duplicate EMP ID check before anything is saved.
- An Update Existing Record form where picking an EMP ID fills in the rest of the record automatically.
- A Delete Record button that asks for confirmation before removing the selected row.
- A protected sheet that the code unprotects only while it writes.
How the Sheet Is Laid Out
In the video the data sits on Sheet1. Row 1 holds the buttons, row 2 the headers (EMP ID in A, EMP Name in B, Gender in C, Designation in D, Salary in E) and the records start in row 3. Gridlines are turned off and the header row is frozen.
Part 1 – Design the Data Entry Form in Excel
Step 1: Add the first button
Go to Developer → Insert → Command Button (ActiveX Control) and draw it above the table. In Properties set the Caption to Add New Record. Right-click → Format Control → Properties and choose Don’t move or size with cells, so the button stays put when rows are added or deleted.
Step 2: Insert the UserForm
Press Alt+F11, choose Insert → UserForm, and in its Properties set Name to add_frm, Caption to Add New Record and pick a BackColor.
Step 3: Add the controls
From the Toolbox add a Label and a control for each field:
- EMP ID – TextBox1
- EMP Name – TextBox2
- Gender – OptionButton1 (Male) and OptionButton2 (Female)
- Designation – ComboBox1
- Salary – TextBox3
Give the boxes a SpecialEffect for a sunken look, then use Format → Align and Format → Vertical Spacing → Make Equal to line everything up. Add two command buttons: Submit (CommandButton1) and Clear (CommandButton2). Finally draw a Frame, move all the controls into it and set its caption, so you can move the whole group at once.
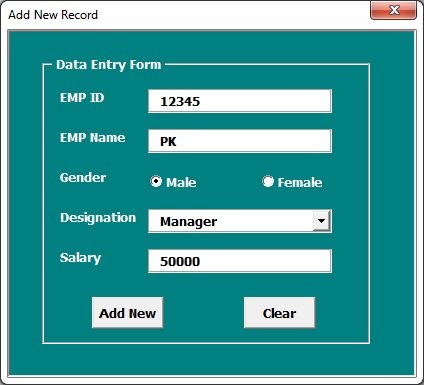
The names matter: the code below refers to TextBox1, ComboBox1, OptionButton1 and so on, so keep the default names or update the code to match.
Part 2 – Code the Add New Record Form
Step 4: Fill the Designation drop-down
Double-click the form, switch the event from Click to Activate and add:
Private Sub UserForm_Activate()

    With Me.ComboBox1
        .Clear
        .AddItem ""
        .AddItem "Agent"
        .AddItem "TL"
        .AddItem "AM"
        .AddItem "DM"
        .AddItem "Manager"
    End With

End Sub
.Clear comes first so the list is not duplicated every time the form opens.
Step 5: Show the form from the sheet button
In Design Mode double-click the Add New Record button and type:
Private Sub CommandButton1_Click()
add_frm.Show
End Sub
Step 6: The Clear button
Private Sub CommandButton2_Click()

Me.TextBox1.Value = ""
Me.TextBox2.Value = ""
Me.TextBox3.Value = ""

Me.ComboBox1.Value = ""

Me.OptionButton1.Value = False
Me.OptionButton2.Value = False

End Sub
Step 7: The Submit button – validation
Every check shows a message and stops with Exit Sub, so nothing is saved until the whole form is correct:
Private Sub CommandButton1_Click()
    ''''''''''' Validation ''''''''''

    If VBA.IsNumeric(Me.TextBox1.Value) = False Then
        MsgBox "Please enter a correct EMP ID", vbCritical
        Exit Sub
    End If

    If Me.TextBox2.Value = "" Then
        MsgBox "Please enter EMP name", vbCritical
        Exit Sub
    End If

    If Me.OptionButton1.Value = False And Me.OptionButton2.Value = False Then
        MsgBox "Please select gender", vbCritical
        Exit Sub
    End If

    If Me.ComboBox1.Value = "" Then
        MsgBox "Please select the designation", vbCritical
        Exit Sub
    End If

    If VBA.IsNumeric(Me.TextBox3.Value) = False Then
        MsgBox "Please enter a correct Salary", vbCritical
        Exit Sub
    End If
Step 8: The Submit button – duplicate check and save
''''''''''' check the duplicate EMP ID
Dim sh As Worksheet
Set sh = ThisWorkbook.Sheets("Sheet1")
Dim n As Long

If Application.WorksheetFunction.CountIf(sh.Range("A:A"), Me.TextBox1.Value) > 0 Then
    MsgBox "This EMP ID is already available in database", vbCritical
    Exit Sub
End If

n = sh.Range("A" & Application.Rows.Count).End(xlUp).Row

sh.Unprotect "1234"

sh.Range("A" & n + 1).Value = Me.TextBox1.Value
sh.Range("B" & n + 1).Value = Me.TextBox2.Value

If Me.OptionButton1.Value = True Then sh.Range("C" & n + 1).Value = "Male"
If Me.OptionButton2.Value = True Then sh.Range("C" & n + 1).Value = "Female"
sh.Range("D" & n + 1).Value = Me.ComboBox1.Value
sh.Range("E" & n + 1).Value = Me.TextBox3.Value

sh.Protect "1234"

Me.TextBox1.Value = ""
Me.TextBox2.Value = ""
Me.TextBox3.Value = ""

Me.ComboBox1.Value = ""

Me.OptionButton1.Value = False
Me.OptionButton2.Value = False

MsgBox "New record has been added", vbInformation

End Sub
How the save code works
COUNTIFcounts how many times the new EMP ID already appears in column A. Anything above 0 means a duplicate, so the record is refused.Range("A" & Rows.Count).End(xlUp).Rowjumps from the bottom of column A up to the last used cell, the same as pressing Ctrl+Up. That gives the last rown, and the new record goes inton + 1.- The sheet is unprotected with the same password used to protect it, the five values are written, and the sheet is protected again. In the video the password is
1234; use your own. - After saving, the boxes are cleared and a confirmation message appears, ready for the next entry.
Part 3 – Update and Delete Records
Step 9: Copy the form for updates
Add a second ActiveX button with the caption Update Existing Record (unprotect the sheet first). Instead of designing a new form, I use a shortcut in the video: drag add_frm onto a temporary new workbook in the Project window (this copies it), rename the copy to Update_frm with the caption Update Existing Record, replace TextBox1 with a combo box (ComboBox2), then drag it back into your workbook. All the code comes along with it.
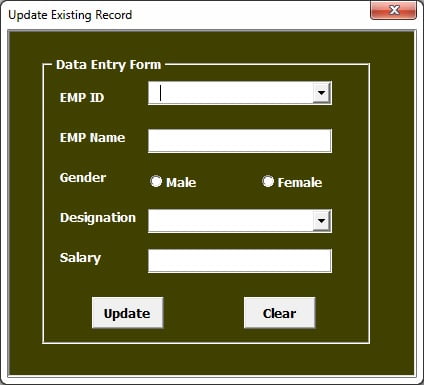
Step 10: List every EMP ID in the drop-down
Add this after the designation list in the Update form’s UserForm_Activate:
Dim sh As Worksheet
Set sh = ThisWorkbook.Sheets("Sheet1")

Dim i As Integer

Me.ComboBox2.Clear
Me.ComboBox2.AddItem ""

For i = 3 To sh.Range("A" & Application.Rows.Count).End(xlUp).Row
    Me.ComboBox2.AddItem sh.Range("A" & i).Value
Next i
The loop starts at row 3, the first record, and runs to the last filled row.
Step 11: Fill the form when an ID is picked
Private Sub ComboBox2_Change()

If Me.ComboBox2.Value <> "" Then
    Dim sh As Worksheet
    Set sh = ThisWorkbook.Sheets("Sheet1")
    Dim i As Integer

    i = Application.Match(VBA.CLng(Me.ComboBox2.Value), sh.Range("A:A"), 0)

    Me.TextBox2.Value = sh.Range("B" & i).Value

    If sh.Range("C" & i).Value = "Male" Then Me.OptionButton1.Value = True
    If sh.Range("C" & i).Value = "Female" Then Me.OptionButton2.Value = True

    Me.ComboBox1.Value = sh.Range("D" & i).Value
    Me.TextBox3.Value = sh.Range("E" & i).Value

End If

End Sub
A combo box returns text, but the IDs in column A are numbers, so VBA.CLng converts the selection to a number first. MATCH with 0 (exact match) then returns the row number of that ID, and the other fields are read from the same row.
Step 12: Adjust Clear and Submit
Because the code was copied, only small changes are needed:
- In Clear, use
Me.ComboBox2.Value = ""instead of TextBox1. - In Submit, delete the duplicate check (the ID already exists) and find the row with the same MATCH line:
n = Application.Match(VBA.CLng(Me.ComboBox2.Value), sh.Range("A:A"), 0). - Write to row
ninstead ofn + 1, so the existing record is overwritten, and replace every TextBox1 reference with ComboBox2.
The sheet button simply runs Update_frm.Show.
Step 13: The Delete Record button
Add a third ActiveX button captioned Delete Record and give it this code:
Private Sub CommandButton3_Click()
Dim sh As Worksheet
Set sh = ThisWorkbook.Sheets("Sheet1")
Dim pk As Integer

If ActiveCell.Row > 2 Then
    pk = MsgBox("Do you want to delete this record?", vbQuestion + vbYesNo)

    If pk = 7 Then Exit Sub

    sh.Unprotect "1234"
    ActiveCell.EntireRow.Delete
    sh.Protect "1234"

End If

End Sub
ActiveCell.Row > 2 protects the button row and the header row. A Yes/No message box returns 6 for Yes and 7 for No (vbNo), so clicking No leaves the macro without deleting anything.
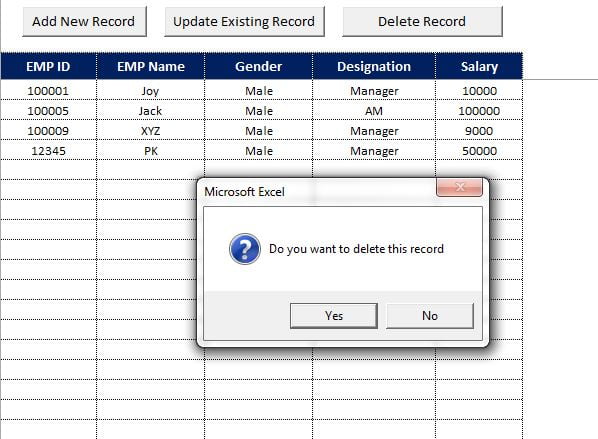
Protect the sheet one last time with Review → Protect Sheet using the same password, and save the workbook as a Macro-Enabled Workbook (.xlsm).
Modern Excel Alternative (No VBA)
This section is an addition to the video. If you do not need validation or protection, Excel’s built-in data form can add, find and delete rows in a table without any code. See Quick Data Entry Form (Without VBA). The VBA UserForm in this tutorial is the better choice when you want strict rules and a locked sheet.
Common Errors and Fixes
These notes are general VBA guidance, added to help you troubleshoot.
Run-time error 1004 when saving
The password in sh.Unprotect does not match the one used to protect the sheet. Use the same password everywhere.
Type mismatch in ComboBox2_Change
CLng fails if the combo box holds text that is not a number. Keep EMP IDs numeric (the Add form already enforces this) and set the combo box Style to fmStyleDropDownList so users can only pick from the list.
Object required or Method or data member not found
A control was renamed or deleted, for example TextBox1 after copying the form. Check the control names in the Properties window and update the code.
Tips
- Keep the default control names while building, then rename them consistently if you prefer descriptive names.
- Always clear a combo box before adding items in UserForm_Activate.
- Store the password in one constant if you protect several sheets, so you change it in one place.
- Learn the difference between Form Controls and ActiveX controls in Microsoft’s overview of forms and controls.
Want It Ready-Made?
The finished workbook from this tutorial, with all three forms and the protected sheet, is available as Data Entry Form in Excel on NextGenTemplates.com. If you want a lighter approach, the Smart Data Entry Form with Minimum VBA is another option, and you can browse all Excel VBA tools.
Related Tutorials
- Data Entry Application in Excel VBA
- VBA UserForm Validation for Mobile Number Input
- Multilevel Dependent Drop-Down in a VBA UserForm
- 5 VBA UserForm Super Tips
- Protect an Excel Worksheet as UserInterfaceOnly
Frequently Asked Questions
How do I create a data entry form in Excel with VBA?
Insert a UserForm in the VBA editor, add text boxes, option buttons and a combo box for each field, then write a Submit macro that validates the inputs and writes them to the next empty row of the sheet. A button on the sheet opens the form with FormName.Show.
How do I stop duplicate IDs in the form?
Before saving, count the new ID in the ID column with Application.WorksheetFunction.CountIf. If the result is greater than 0, show a message and exit the macro without saving.
How does the Update form find the right record?
It lists every ID in a combo box. When you pick one, Application.Match returns its row number, and the code reads the name, gender, designation and salary from that row into the form.
Why is the worksheet protected?
Protection stops anyone from typing over or deleting records by hand. The macros unprotect the sheet, make the change and protect it again, so data only changes through the validated forms.
Can I add more fields to the form?
Yes. Add a label and a control to each form, add a validation check if needed, and add one more line that writes the value to the next column, for example column F.
About the Author
PK is a Microsoft Excel expert and trainer and the founder of PK: An Excel Expert and NextGenTemplates.com. He has been teaching Excel, VBA, Power Query and Power BI since 2016 on his YouTube channel.
Conclusion
A data entry form in Excel with VBA keeps your data clean: users fill in a friendly form, the code checks every field and blocks duplicates, and the protected sheet can only change through the Add, Update and Delete buttons. Build the Add form first, copy it for updates, add the delete button, and you have a small but solid data entry system.