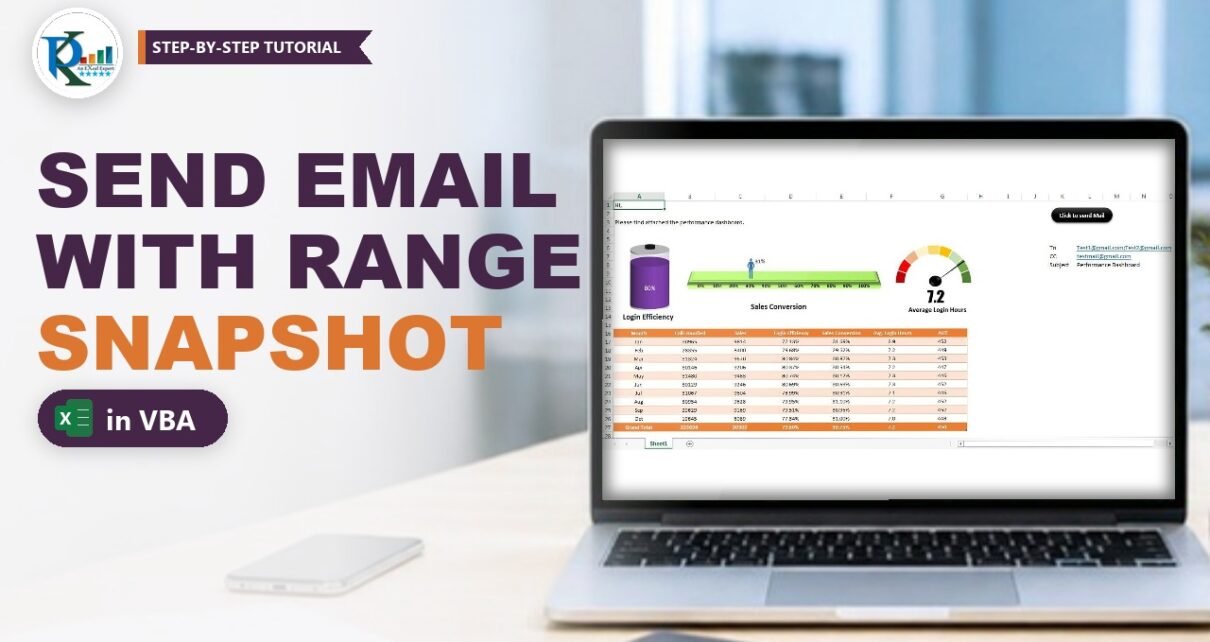
With a short Excel VBA macro you can send an email with a snapshot of your worksheet: the text, charts, pictures and tables in a range land in the body of an Outlook email exactly as they look in Excel. This tutorial uses the MailEnvelope method, which needs only a dozen lines of code. You lay out a sheet like an email, keep the To, CC and Subject in three cells, and one click on a button sends the whole range. It is a handy way to mail a daily dashboard or report without copying and pasting.
Watch the Video Tutorial
In the video PK clicks the button, allows the Outlook prompt, shows the email arriving in Outlook as a snapshot of the range, and then writes the macro line by line in a new module.
What You Will Build
- An email-ready worksheet with a greeting, a message, charts, a data table and a signature.
- Recipient cells for To, CC and Subject that the macro reads, so you never edit the code to change them.
- A dynamic range that grows or shrinks with the last used row in column A.
- A one-click button that sends the range as the Outlook mail body and confirms with a Done message.
- An optional attachment line for sending a file along with the snapshot.
Part 1 – Prepare the Email Sheet
Step 1: Lay out the body in columns A to H
Treat the worksheet as the body of your email. In PK’s example the sheet is named Sheet1:
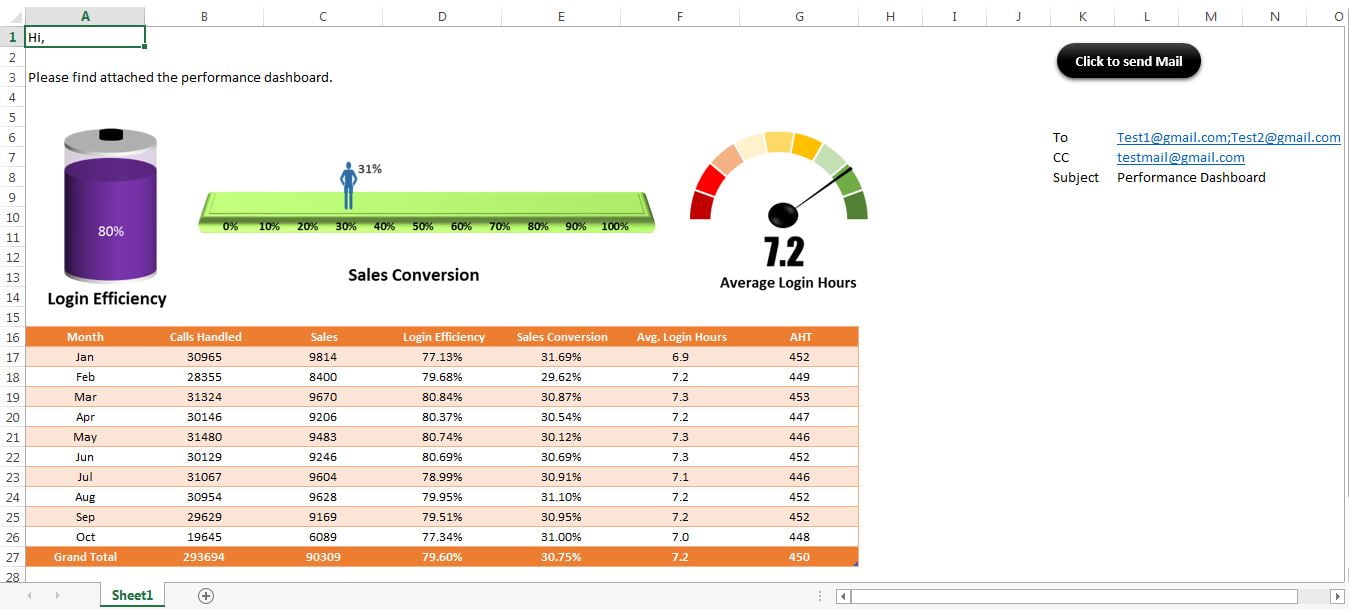
- A1 says Hi, and A3 holds the message line, Please find attached the performance dashboard.
- Rows 5 to 14 hold three visuals: a Login Efficiency cylinder, a Sales Conversion progress bar and an Average Login Hours gauge.
- A16:G27 holds the monthly table (Month, Calls Handled, Sales, Login Efficiency, Sales Conversion, Avg. Login Hours and AHT) with a Grand Total row.
- The signature goes below the table. In the video the last row is 31.
Everything you want in the email must sit inside columns A to H, and column A must have something in the last row so the macro can find where the email ends.
Step 2: Add the To, CC and Subject cells
Outside the body, type the labels To, CC and Subject in K6:K8 and the values in L6, L7 and L8. To send to several people, separate the addresses with semicolons, for example name1@company.com;name2@company.com.
Part 2 – Write the Send Email with Snapshot Macro
Step 3: Insert a module
Open the Visual Basic Editor with Developer › Visual Basic or Alt+F11. Choose Insert › Module (or press Alt+I+M). If you are new to the editor, PK’s Excel VBA introduction walks through it.
Step 4: Paste the code
This is the macro exactly as PK writes it in the video:
Option Explicit

Sub Send_Email_With_snapshot()
Dim sh As Worksheet
Set sh = ThisWorkbook.Sheets("Sheet1")

Dim lr As Integer
lr = sh.Range("A" & Application.Rows.Count).End(xlUp).Row

sh.Range("A1:H" & lr).Select

With Selection.Parent.MailEnvelope.Item
    .to = sh.Range("L6").Value
    .cc = sh.Range("L7").Value
    .Subject = sh.Range("L8").Value
    '.attachments.add ""
    .send
End With

MsgBox "Done"

End Sub
Change "Sheet1", the column letter H and the three cell addresses if your layout is different.
How the Code Works
Set sh = ThisWorkbook.Sheets("Sheet1")points the macro at the email sheet. Because the next lines use.Select, Sheet1 must be the active sheet when the macro runs, which is automatic when you click the button placed on that sheet.sh.Range("A" & Application.Rows.Count).End(xlUp).Rowstarts at the very last row of column A and jumps up to the last cell that has data. PK makes the last row dynamic because the email may be longer or shorter next time.sh.Range("A1:H" & lr).Selectselects the body, for example A1:H31. The selection is what goes into the mail body, including the charts and pictures that sit on top of it.Selection.Parentis the worksheet that owns the selection. ItsMailEnvelopeis the email header Excel can attach to a sheet, and.Itemis the Outlook mail item behind it..to,.ccand.Subjectread L6, L7 and L8, so you change recipients on the sheet, not in the code..sendsends the email straight away, andMsgBox "Done"tells you it has gone.
Part 3 – Add an Attachment (Optional)
The snapshot is enough for most reports, so PK leaves the attachment line commented out with an apostrophe. To send a file as well, remove the apostrophe and put the full path, file name and extension inside the quotes. The original article used this example:
.Attachments.Add "C:\Users\User\Desktop\Projects\Mar-2018.xlsx"The file must exist at that path when the macro runs.
Part 4 – Run It from a Button
Step 5: Save as a macro-enabled workbook
Save the file as Excel Macro-Enabled Workbook (*.xlsm), otherwise the code is lost when you close it. PK’s file is named Send Mail with Excel Range.xlsm.
Step 6: Assign the macro and send
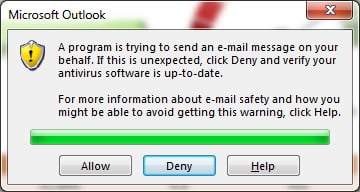
Draw a shape or button near the recipient cells (PK’s says Click to send Mail), right-click it, choose Assign Macro and pick Send_Email_With_snapshot. Click it, and Outlook may show a security prompt saying a program is trying to send an email on your behalf. Click Allow. The Done message appears and the email arrives with the range in its body.
Common Errors and Fixes
This section and the Tips below are additions to PK’s original method.
Run-time error 9: Subscript out of range
The sheet name in Sheets("Sheet1") does not match your tab. Rename the tab or change the name in the code.
Nothing is sent, or an Outlook error appears
MailEnvelope works through the classic Outlook desktop app, which must be installed and set up with an email account. Open Outlook once, then run the macro again.
Part of the email is missing
The last row comes from column A. If your signature or last line sits in another column, column A ends earlier and so does the range. Put something in column A on the last row, or point lr at a different column.
Error on the attachment line
The path or file name is wrong, or the file has been moved. Check the full path including the extension, or comment the line out again.
Tips
- Use
Dim lr As Longinstead ofIntegerif your sheet could ever go beyond row 32,767. It costs nothing and avoids an overflow error. - Keep the email area tidy: hide gridlines and set column widths so the snapshot reads well on a phone.
- Store the subject as a formula, for example a text with today’s date, so every email has a unique subject.
- Test with your own address in L6 before you send to managers or clients.
- Microsoft documents the Worksheet.MailEnvelope property used in this macro.
Want It Ready-Made?
If you would like the finished workbook with the email layout, recipient cells, button and macro already wired up, get Send Email with Outlook Mail Body Snapshot from NextGenTemplates.com. For more ready-to-use automation, browse the Excel VBA tools collection.
Related Tutorials
- Send Bulk Emails Using VBA and Outlook
- Bulk Auto Emailer with Picture Signature and HTML Body
- Automated Multiple Emails with Multiple Attachments and From Option
- Automation: Excel to PDF Converter
- Excel VBA Introduction: Editor Tour and First Macro
Frequently Asked Questions
How do I send an Excel range in the body of an Outlook email?
Select the range in VBA and use the worksheet’s MailEnvelope. Set the To, CC and Subject on MailEnvelope.Item and call Send. The selected cells, charts and pictures appear in the email body.
Will the charts and images appear in the email?
Yes. Charts and pictures that sit on top of the selected range are included in the mail body, which is why the method is called sending a snapshot.
Can I send to more than one person?
Yes. Type several addresses in the To or CC cell separated by semicolons.
How do I attach a file as well?
Remove the apostrophe in front of the attachments line and put the full path, file name and extension of the file inside the quotes.
Why does Outlook ask me to allow the email?
Outlook can warn you when a program tries to send email on your behalf. Click Allow to send it. How often the prompt appears depends on your Outlook and antivirus settings.
Does it work with the new Outlook or Outlook on the web?
The macro talks to the classic Outlook desktop app on Windows, so it needs that app installed and set up with your account.
About the Author
PK is a Microsoft Excel expert and trainer and the founder of PK: An Excel Expert and NextGenTemplates.com. He has been teaching Excel, VBA, Power Query and Power BI since 2016 on his YouTube channel.
Conclusion
To send an email with a snapshot in Excel VBA you only need three things: a sheet laid out like an email, three cells for To, CC and Subject, and the MailEnvelope macro that selects the range and sends it. Make the last row dynamic, assign the macro to a button, and your report or dashboard reaches the inbox exactly as it looks in Excel with a single click.