When one long sheet holds the data for many people, you often have to split data into separate workbooks, one file per supervisor, region or customer, so that each person gets only their own rows. Doing it by hand means filtering, copying, pasting and saving again and again. In this tutorial you get a ready-to-use VBA macro that does it in one click: it reads the unique values of a column, filters the data for each value and saves every result as its own .xlsx file in a folder you choose. It works in desktop Excel for Windows (Excel 2010 to Microsoft 365).
Watch the Video Tutorial
The video walks through the same file: the employee data, the Settings sheet with the folder path and the Split Data button, the macro code, and the separate workbooks it creates for each supervisor.
What You Will Build
- A one-click macro that creates one workbook for every unique supervisor in column B.
- A Settings sheet where you type the output folder once, plus a button to run the macro.
- Clean output files: each workbook holds the header row and only that supervisor’s rows, with fitted columns.
- Safe file names: characters like / or : in a name are replaced, and blank values go to a file called Blank.
- Error handling that checks the folder first and always restores Excel’s settings if something goes wrong.
The Workbook Layout
The macro expects two sheets in the same workbook.
The Data sheet
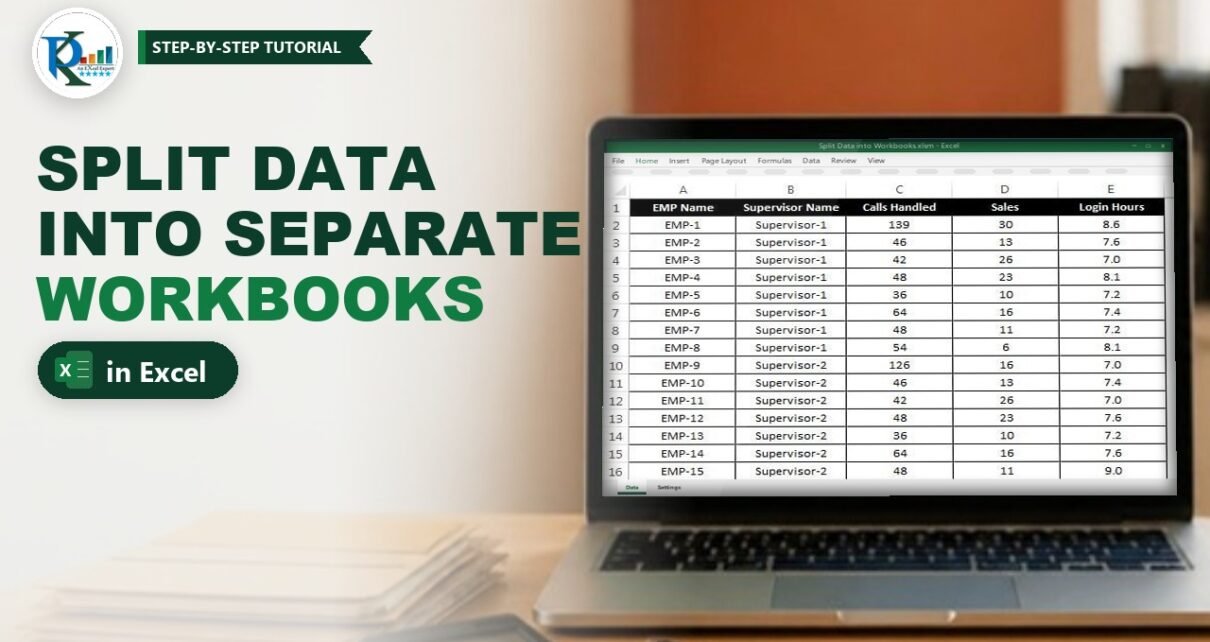
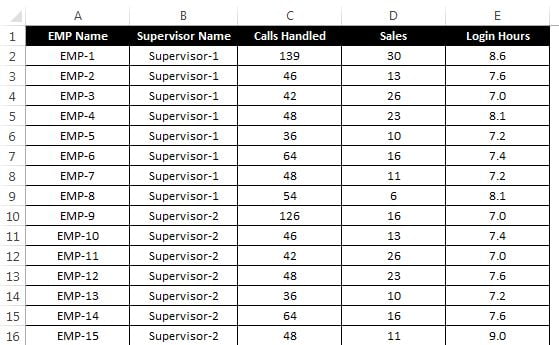
The Data sheet holds the table, with headers in row 1 starting at A1 and no fully empty rows or columns inside it. In the sample file the columns are EMP Name, Supervisor Name, Calls Handled, Sales and Login Hours. Column B (Supervisor Name) is the column we split on.
The Settings sheet
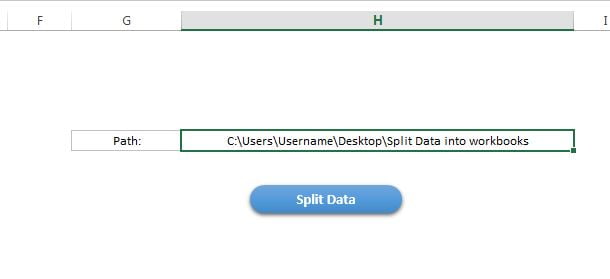
The Settings sheet has the output folder path in cell H6, for example C:\Users\Username\Desktop\Split Data into workbooks, and a Split Data button that runs the macro. Create the folder first; the macro checks that it exists before it starts.
How to Split Data into Separate Workbooks with VBA
Step 1: Open the VBA editor and insert a module
Press Alt + F11 to open the Visual Basic Editor, then press Alt + I + M (Insert › Module) to add a new module.
Step 2: Paste the macro
Copy the code below and paste it into the module. It keeps the logic of the original macro (filter by each supervisor, copy the visible rows to a new workbook, save it in the Settings folder) and adds error handling, faster screen settings and file-name cleaning.
Option Explicit

'================================================================
' Split Data into Separate Workbooks
' Creates one .xlsx file for every unique value in the split
' column (column B "Supervisor Name" in the sample file) and saves
' it in the folder typed in Settings!H6.
' PK: An Excel Expert - www.pk-anexcelexpert.com
'================================================================

Private Const DATA_SHEET As String = "Data"         'sheet that holds the data
Private Const SETTINGS_SHEET As String = "Settings" 'sheet that holds the path
Private Const PATH_CELL As String = "H6"            'cell with the output folder
Private Const SPLIT_COLUMN As Long = 2              '2 = column B (Supervisor Name)

Sub Split_Data_in_workbooks()

    Dim data_sh As Worksheet, setting_Sh As Worksheet
    Dim nwb As Workbook, nsh As Worksheet
    Dim dataRng As Range, keyRng As Range, cell As Range
    Dim uniqueList As Object, key As Variant
    Dim folderPath As String, outName As String
    Dim filesSaved As Long
    Dim calcMode As XlCalculation

    Set data_sh = ThisWorkbook.Worksheets(DATA_SHEET)
    Set setting_Sh = ThisWorkbook.Worksheets(SETTINGS_SHEET)

    '--- 1. Check the output folder ------------------------------
    folderPath = Trim$(CStr(setting_Sh.Range(PATH_CELL).Value))
    If folderPath = "" Then
        MsgBox "Please type a folder path in " & SETTINGS_SHEET & "!" & PATH_CELL & ".", vbExclamation
        Exit Sub
    End If
    If Right$(folderPath, 1) <> Application.PathSeparator Then
        folderPath = folderPath & Application.PathSeparator
    End If
    If Dir(folderPath, vbDirectory) = "" Then
        MsgBox "This folder does not exist:" & vbNewLine & folderPath, vbExclamation
        Exit Sub
    End If

    '--- 2. Speed settings (always restored in CleanUp) ---------
    calcMode = Application.Calculation
    On Error GoTo ErrHandler
    Application.ScreenUpdating = False
    Application.DisplayAlerts = False          'overwrite older files without asking
    Application.Calculation = xlCalculationManual

    '--- 3. The data block: headers in row 1, starting at A1 ----
    data_sh.AutoFilterMode = False
    Set dataRng = data_sh.Range("A1").CurrentRegion
    If dataRng.Rows.Count < 2 Then
        MsgBox "No data found below the headers on the " & DATA_SHEET & " sheet.", vbInformation
        GoTo CleanUp
    End If

    '--- 4. Collect the unique values of the split column -------
    Set uniqueList = CreateObject("Scripting.Dictionary")
    uniqueList.CompareMode = vbTextCompare     'Supervisor-1 = supervisor-1
    Set keyRng = dataRng.Columns(SPLIT_COLUMN).Offset(1, 0).Resize(dataRng.Rows.Count - 1, 1)
    For Each cell In keyRng.Cells
        If Not IsError(cell.Value) Then
            If Not uniqueList.Exists(CStr(cell.Value)) Then uniqueList.Add CStr(cell.Value), Nothing
        End If
    Next cell

    '--- 5. One workbook per unique value -------------------------
    For Each key In uniqueList.Keys

        'Filter the split column ("=" on its own picks the blank rows)
        dataRng.AutoFilter Field:=SPLIT_COLUMN, Criteria1:="=" & key

        'New workbook with a single sheet
        Set nwb = Workbooks.Add(xlWBATWorksheet)
        Set nsh = nwb.Worksheets(1)

        'Copy the headers + visible (filtered) rows only
        dataRng.SpecialCells(xlCellTypeVisible).Copy nsh.Range("A1")
        nsh.UsedRange.Columns.AutoFit

        'Safe name for the file and the sheet tab
        outName = CleanFileName(CStr(key))
        On Error Resume Next                    'a rare reserved tab name is not fatal
        nsh.Name = Left$(outName, 31)
        On Error GoTo ErrHandler

        nwb.SaveAs Filename:=folderPath & outName & ".xlsx", FileFormat:=xlOpenXMLWorkbook
        nwb.Close SaveChanges:=False
        Set nwb = Nothing
        filesSaved = filesSaved + 1

        data_sh.AutoFilterMode = False
    Next key

    MsgBox filesSaved & " workbook(s) saved in:" & vbNewLine & folderPath, vbInformation

CleanUp:
    data_sh.AutoFilterMode = False
    Application.Calculation = calcMode
    Application.DisplayAlerts = True
    Application.ScreenUpdating = True
    Exit Sub

ErrHandler:
    If Not nwb Is Nothing Then nwb.Close SaveChanges:=False
    MsgBox "The macro stopped after " & filesSaved & " file(s)." & vbNewLine & _
           "Error " & Err.Number & ": " & Err.Description, vbCritical
    Resume CleanUp

End Sub

'Replaces characters Windows does not allow in file names
Private Function CleanFileName(ByVal txt As String) As String
    Dim badChars As Variant, ch As Variant
    badChars = Array("\", "/", ":", "*", "?", """", "<", ">", "|", "[", "]")
    For Each ch In badChars
        txt = Replace(txt, ch, "_")
    Next ch
    txt = Trim$(txt)
    Do While Right$(txt, 1) = "."               'no trailing dots
        txt = Left$(txt, Len(txt) - 1)
    Loop
    If txt = "" Then txt = "Blank"
    CleanFileName = Left$(txt, 100)
End Function
Step 3: Save as a macro-enabled workbook
Use File › Save As and choose Excel Macro-Enabled Workbook (*.xlsm). A normal .xlsx file throws the code away when you close it.
Step 4: Add the Split Data button
On the Settings sheet, go to Insert › Shapes, draw a rounded rectangle and type Split Data on it. Right-click the shape, choose Assign Macro and pick Split_Data_in_workbooks. You can also run it any time with Alt + F8.
Step 5: Run it
Type the folder path in H6, click the button and wait for the message that tells you how many workbooks were saved. Open the folder and you will see one file per supervisor, for example Supervisor-1.xlsx and Supervisor-2.xlsx.
How the Macro Works
- Settings at the top. The four constants hold the sheet names, the path cell and the split column. To split by another column, change
SPLIT_COLUMN(3 = column C, and so on). Nothing else needs to change. - Folder check.
Dir(folderPath, vbDirectory)returns an empty string when the folder doesn’t exist, so the macro stops with a clear message instead of failing halfway. It also adds the missing backslash at the end of the path. - Unique list. The original version copied column B to the Settings sheet and used Remove Duplicates. This version keeps the unique values in a
Scripting.Dictionaryin memory, so it never overwrites anything on your sheets.vbTextComparetreats “Supervisor-1” and “supervisor-1” as the same value, just like AutoFilter does. - Filter and copy.
dataRng.AutoFilter Field:=SPLIT_COLUMN, Criteria1:="=" & keyfilters one supervisor;"="on its own picks the blank rows.SpecialCells(xlCellTypeVisible)then copies only the header and the visible rows into a new one-sheet workbook. - Clean names.
CleanFileNamereplaces\ / : * ? " < > | [ ]with an underscore, removes trailing dots and uses “Blank” for empty values, soSaveAsnever fails on a name like “R&D / Ops”. The sheet tab gets the same name, cut to 31 characters. - Speed and safety. ScreenUpdating and automatic calculation are switched off while the files are created, and DisplayAlerts is off so old files with the same name are overwritten without a prompt. The
CleanUpblock switches everything back, even after an error.
No-VBA Alternative (for a Few Groups)
If you only need two or three files and you have Microsoft 365 or Excel 2021, you can do it with formulas. On a new sheet, list the supervisors with =UNIQUE(Data!B2:B100). Then, in another cell, pull one supervisor’s rows:
=FILTER(Data!A2:E100,Data!B2:B100="Supervisor-1")Copy the result, paste it into a new workbook with Paste Special › Values, add the header row and save. It’s fine for a handful of groups, but for ten or more files the macro is much faster and avoids copy mistakes.
Common Errors & Fixes
“This folder does not exist”
The path in H6 has a typo or the folder was never created. Create the folder in File Explorer, copy its path from the address bar and paste it into H6.
Error 1004 on SaveAs
A file with the same name is open in Excel, or you don’t have permission to write in that folder (some OneDrive or network folders). Close the open file, or point H6 to a local folder.
The new files are missing rows or columns
CurrentRegion stops at the first fully empty row or column. Remove empty rows and columns inside the data, and make sure the headers start in A1.
Error 429 “ActiveX component can’t create object”
Scripting.Dictionary exists only in Windows Excel. On a Mac, run the macro on a Windows PC or use the no-VBA method above.
Tips
- Sort the data by the split column first; the files then come out in alphabetical order and are easier to check.
- Split on a text column such as a name or region. Date and number columns can filter differently from how they look on screen.
- Keep a backup of the folder before re-running, because files with the same name are overwritten.
- If your data is an Excel Table, clear any table filters before running the macro, or convert it with Table Design › Convert to Range.
- Microsoft’s Range.AutoFilter reference explains every argument the macro uses.
Want It Ready-Made?
If you’d rather not set up the sheets and the button yourself, get the ready-to-use Split Data into Separate Workbooks tool on NextGenTemplates.com, or browse more Excel templates.
Related Tutorials
- VBA user form to segregate data into multiple worksheets (split into sheets instead of files)
- Data consolidation from multiple files in Excel (the reverse: combine many files into one)
- VBA: filter data with multiple values
- Check folder existence using VBA
- Create multiple folders from an Excel range
Frequently Asked Questions
How do I split an Excel sheet into multiple workbooks based on a column?
Use the macro in this tutorial. It finds every unique value in the split column, filters the data for each one and saves the visible rows as a separate .xlsx file. Change SPLIT_COLUMN to choose the column.
Can I split data into separate workbooks without VBA?
Yes, for a few groups. In Microsoft 365 or Excel 2021, use UNIQUE to list the values and FILTER to pull each group’s rows, then paste them as values into a new workbook and save it. For many groups, VBA is faster.
Where are the new workbooks saved?
In the folder typed in cell H6 of the Settings sheet. Each file is named after the supervisor (or other split value), for example Supervisor-1.xlsx.
Will the macro overwrite files that already exist?
Yes. DisplayAlerts is switched off, so a file with the same name is replaced without asking. Use a new folder or back up the old files if you need to keep them.
Does the macro change my original data?
No. It only filters the Data sheet while it works and removes the filter at the end. Unlike the older version, it no longer writes a helper list to column A of the Settings sheet.
Can I split by region or product instead of supervisor?
Yes. Change the SPLIT_COLUMN constant to the column number of Region, Product or any other column, and the macro creates one workbook per value in that column.
About the Author
PK is a Microsoft Excel expert and trainer, and the founder of PK: An Excel Expert and NextGenTemplates.com. He has been sharing Excel, VBA and Power BI tutorials since 2016 on this site and on his YouTube channel.
Conclusion
With one macro you can split data into separate workbooks in seconds: one clean file per supervisor, saved to the folder you choose. Set the split column once, keep the path in the Settings sheet, and click Split Data whenever new data arrives.