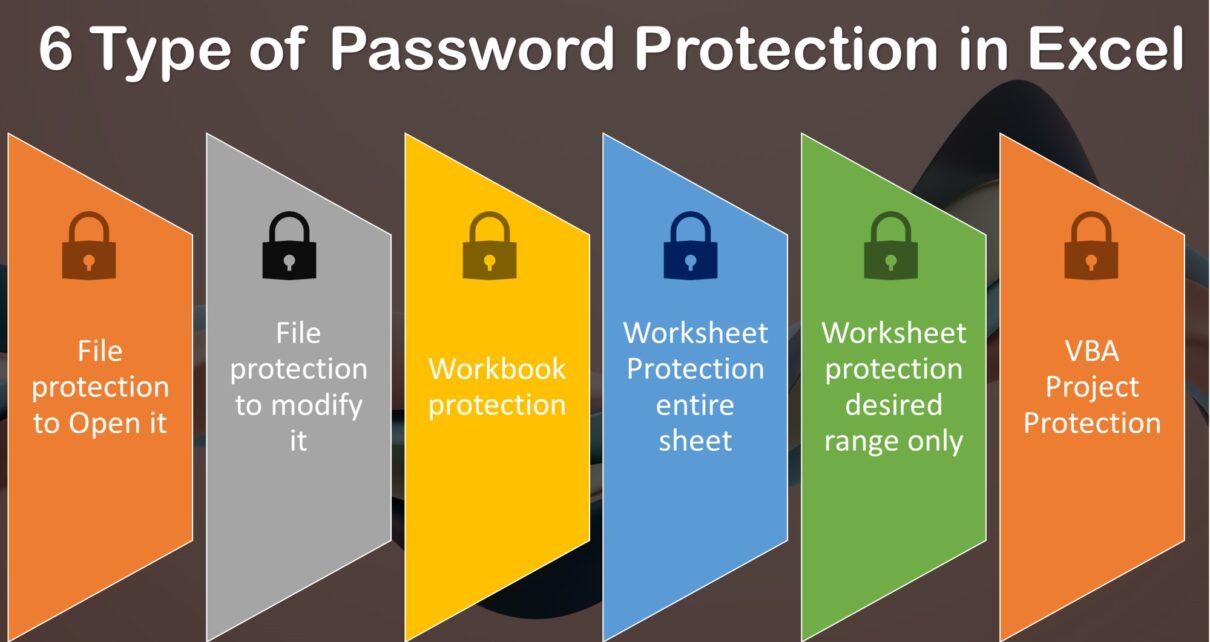
Microsoft Excel, a powerful spreadsheet program, offers a range of password protection features that ensure the security and integrity of your data. This article will delve into 6 types of Password Protection in Microsoft Excel.
Understanding Password Protection in Microsoft Excel
Password protection in Excel is a critical feature, especially when dealing with sensitive data or collaborative projects. This functionality ranges from protecting an entire Excel file to locking specific cells, offering the flexibility to choose the level of security that suits your needs.
Excel File Password: A Robust First Line of Defense
Securing your Excel document with a password is indeed one of the key ways to ensure your data’s confidentiality. In essence, this feature is essential for protecting sensitive information from unauthorized access. To clarify, when this password protection system in Excel is activated, it prompts the user for a password each time the document is opened. Thus, it serves as a first line of defense against unauthorized access.
In-Depth Guide: Protecting an Excel File with a Password
In order to apply a password to an Excel file, it’s helpful to understand the process thoroughly. Below, we provide a detailed, step-by-step guide to make your Excel file password-protected.
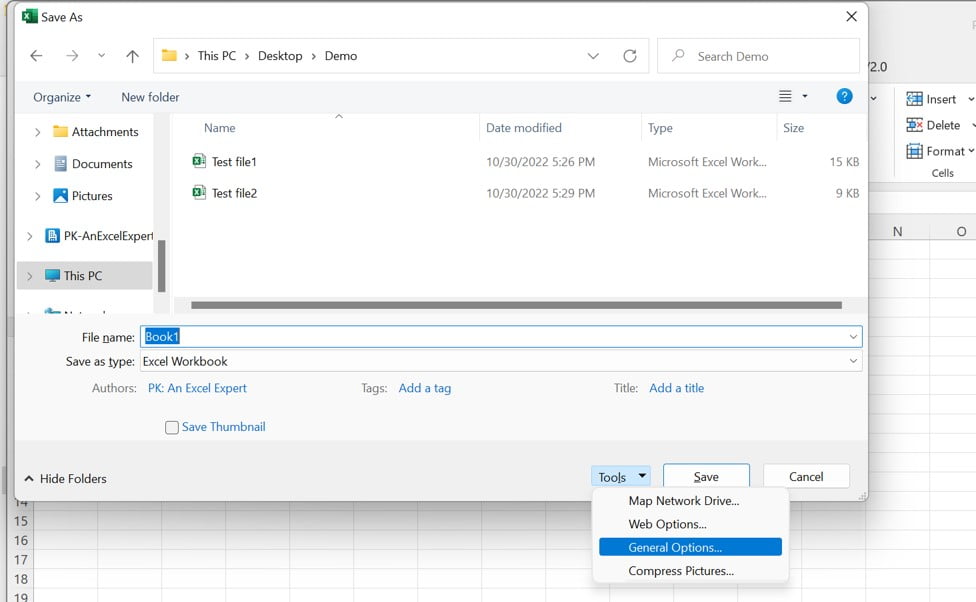
Step 1: Accessing the ‘Save As’ Dialog Box
Initially, the first step towards protecting your Excel file with a password involves accessing the ‘Save As’ dialog box. This is the location where you can set a password that will be required to open the file. Simply press the F12 function key on your keyboard to access this dialog box.
Step 2: Navigating to ‘General Options’
Once you’ve opened the ‘Save As’ dialog box, look for a ‘Tools’ drop-down menu near the bottom of the box. Go ahead and click on this menu to expand it, and then select the ‘General Options’ feature. Consequently, this will lead you to a new dialog box where you can set the desired password.
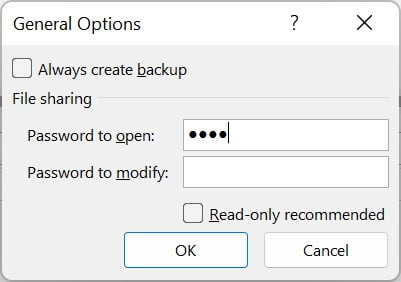
Step 3: Inputting Your Password
Next, within the ‘General Options’ dialog box, you’ll find two fields: ‘Password to open’ and ‘Password to modify’. Here, in the ‘Password to open’ field, type in the password you want to use. Each time you or anyone else tries to open the Excel file, this password will be required.
Keep in mind to choose a password that is both secure and memorable. A secure password typically includes a combination of uppercase and lowercase letters, numbers, and symbols. However, it’s important to remember that if you forget this password, Excel does not offer a password recovery option, and you might lose access to your file.
After inputting your password, click ‘OK’. You’ll be asked to confirm your password by entering it again in a new dialog box. Once you’ve confirmed your password, click ‘OK’. Afterwards, you’ll return to the ‘Save As’ dialog box.
Step 4: Saving Your Password-Protected File
Finally, now that you’ve set your password, the last step is to save your file. You can accomplish this by clicking the ‘Save’ button in the ‘Save As’ dialog box. Upon clicking ‘Save’, your Excel file will now be password-protected. The next time you open the file, Excel will prompt you to enter the password.
In conclusion, setting a password to open an Excel file is a simple yet effective way to secure your data. Whether you’re protecting sensitive business data or personal information, this feature provides you with peace of mind, knowing your information is safe from unauthorized access.
Lock Excel File: Prevent Unauthorized Modifications
In addition to protecting your Excel file from unauthorized access, another handy feature available is the ability to set a password to prevent modifications. This feature essentially allows the file to be opened as ‘Read Only’ for users without the password. Consequently, this ensures the data’s integrity remains intact.
Comprehensive Guide: Applying a Modification Password
To safeguard your Excel file from unwanted edits, it’s crucial to understand how to set a modification password. Below, I’ll guide you through each step of this straightforward process.
Step 1: Access the ‘Save As’ Dialog Box
First and foremost, open the ‘Save As’ dialog box. This dialog box is where you’ll set the modification password for your Excel file. To do this, simply press the F12 function key on your keyboard.
Step 2: Locate ‘General Options’
Next, within the ‘Save As’ dialog box, locate the ‘Tools’ drop-down menu. Once you find it, click on it to expand the menu. Here, you’ll find the ‘General Options’ feature. Go ahead and select this option. As a result, this action will prompt a new dialog box to appear where you can set the desired modification password.
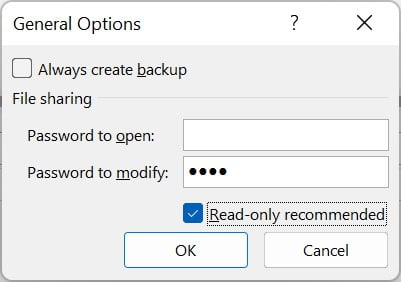
Step 3: Input Your Modification Password
Moving forward, within the ‘General Options’ dialog box, locate the ‘Password to modify’ field. In this field, you should input the password you’ve chosen. This password will restrict users from modifying your Excel file unless they enter the correct password.
As with the opening password, it’s important to choose a modification password that is both secure and memorable. Remember, if this password is forgotten, Excel doesn’t offer a password recovery option, which could potentially lead to permanent modification restrictions.
After entering your password, click ‘OK’. Following this, you’ll be asked to confirm your password by re-entering it in a new dialog box. After you’ve reconfirmed your password, click ‘OK’. Subsequently, you’ll return to the ‘Save As’ dialog box.
Step 4: Saving Your Modification Password Protected File
Finally, the last step in this process is to save your file. This action can be completed by clicking the ‘Save’ button in the ‘Save As’ dialog box. Once this is done, your Excel file will have the added protection of a modification password. Consequently, each time the file is opened, Excel will provide an option to open the file as ‘Read Only’ or request the modification password.
In conclusion, setting a password to restrict modifications of an Excel file is a powerful tool for maintaining the integrity of your data. Regardless of whether you’re safeguarding sensitive business data or personal information, this feature will give you confidence that your data remains unaltered unless authorized changes are made.
Protect Excel Range: Securing Workbook Structure
Beyond the protection of your Excel file data, you can also secure the structure of your workbook. Essentially, applying a password protection to the workbook structure prevents users from making structural modifications. As such, actions such as hiding, unhiding, deleting, adding, or renaming worksheets become restricted to those without the password. As a result, this ensures the workbook’s structure remains consistent.
Detailed Steps: How to Protect Workbook Structure
To shield your workbook structure from undesired alterations, it’s crucial to understand how to set a protection password. Below, I’ll guide you through each step of this easy-to-follow process.
Step 1: Navigate to the ‘Review’ Tab
Initially, you’ll need to navigate to the ‘Review’ tab. This tab is located in Excel’s main menu ribbon. To do this, simply click on the ‘Review’ tab. This action will expose a new menu with various options.
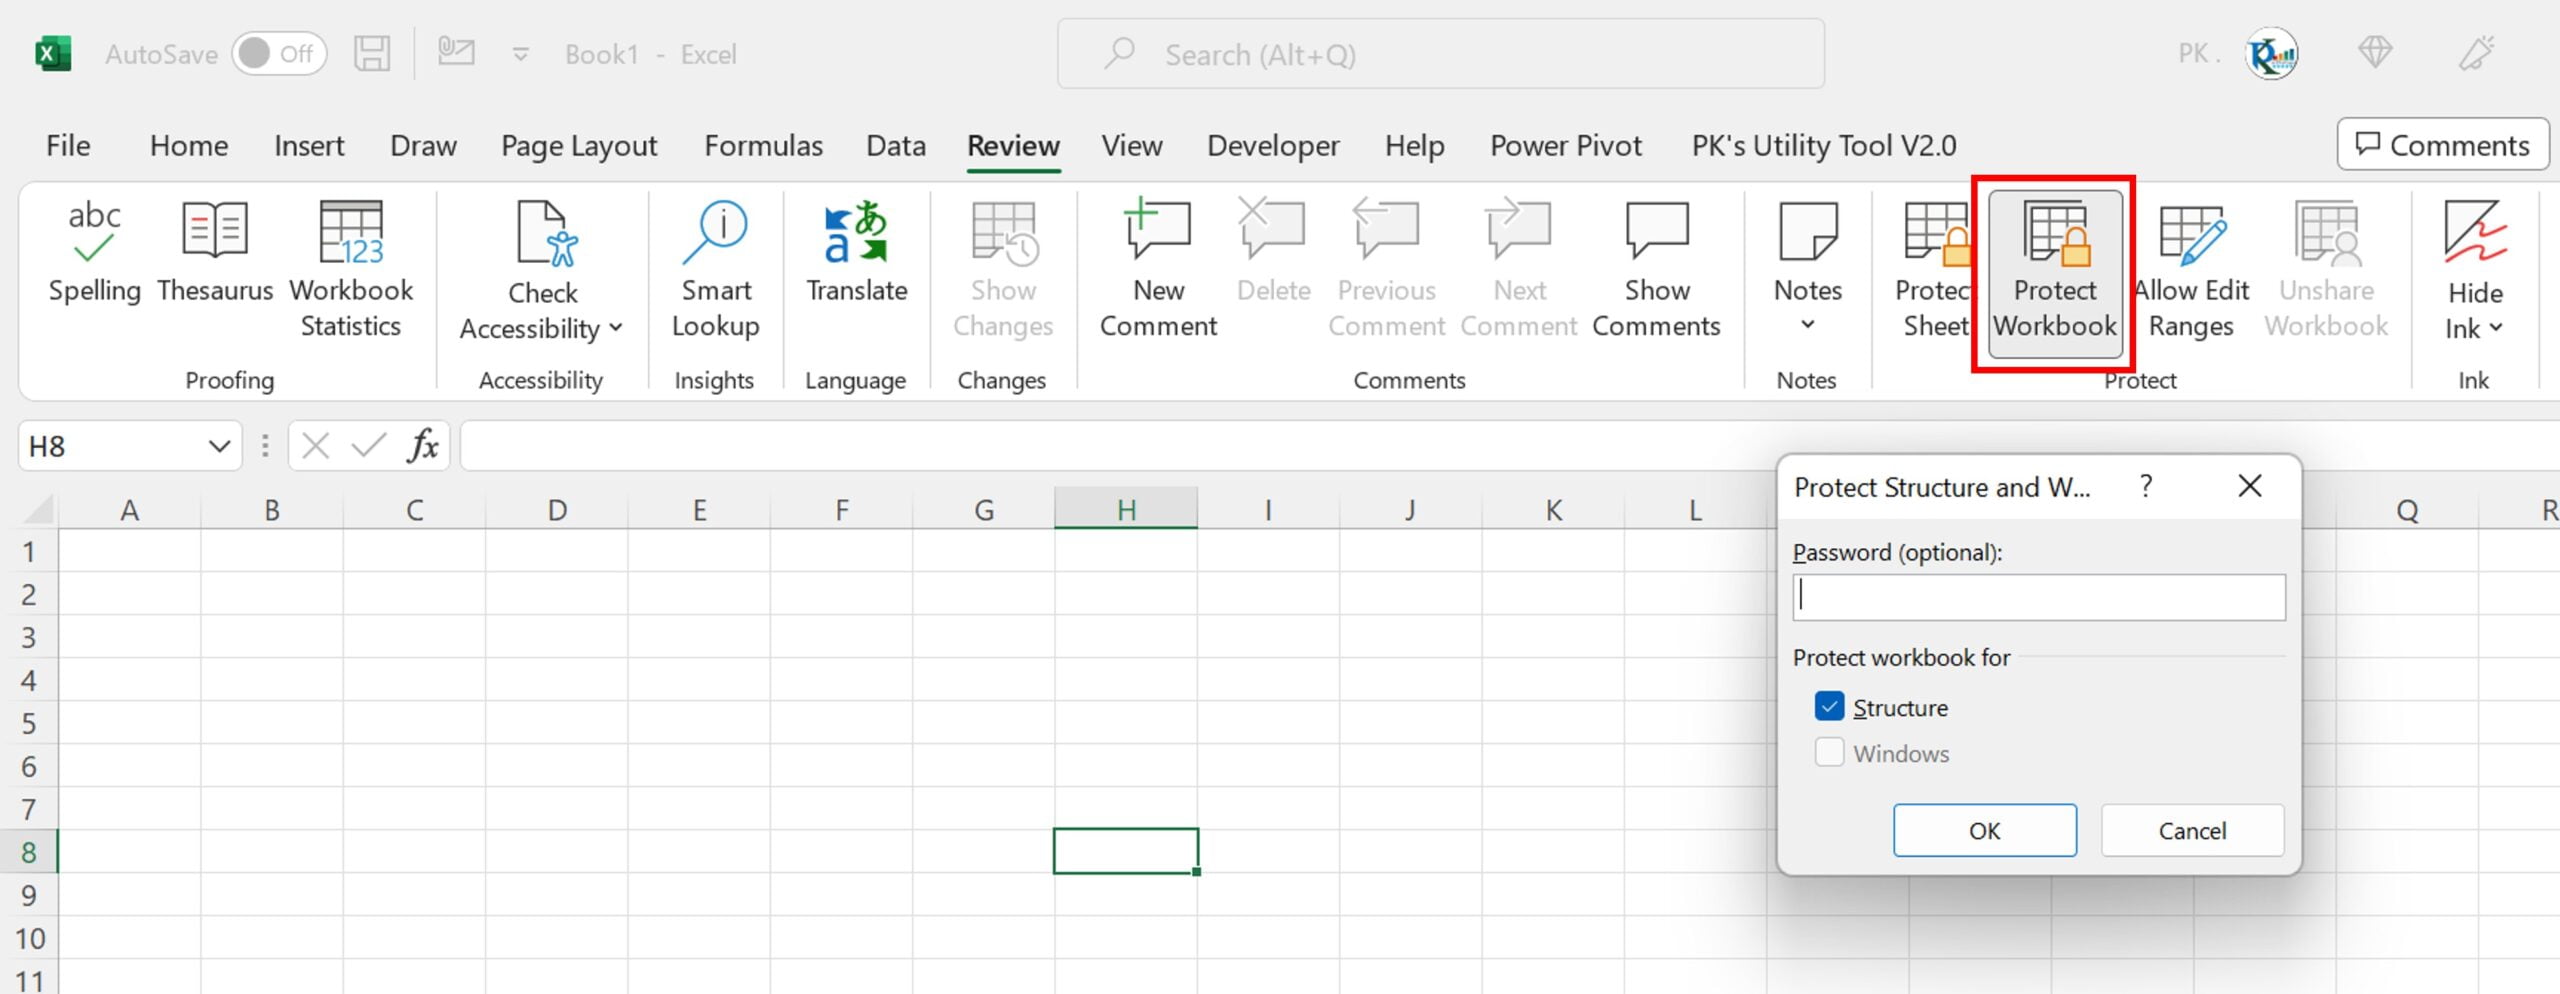
Step 2: Select ‘Protect Workbook’
Next, within the ‘Review’ tab menu, look for the ‘Protect Workbook’ option. Once you locate this option, go ahead and click on it. Consequently, this will trigger a dialog box to pop up where you’ll be able to set a password for workbook structure protection.
Step 3: Input Your Password
Lastly, within the dialog box that appears, you’ll need to input your chosen password. This password will restrict users from altering the structure of your Excel workbook unless they enter the correct password.
As with the previous passwords, it’s essential to choose a password that is both secure and memorable. Be aware, if this password is forgotten, Excel doesn’t offer a password recovery option, which could potentially lead to permanent structure protection.
After entering your password, click ‘OK’. Following this, you’ll be asked to confirm your password by re-entering it in a new dialog box. Once you’ve reconfirmed your password, click ‘OK’.
In conclusion, setting a password to protect the structure of an Excel workbook is an effective way to maintain the consistency of your workbook structure. Whether you’re preserving a complex business report or a personal budget workbook, this feature ensures that your workbook’s structure remains exactly as you intended.
Worksheet Protection: Safeguarding Sheet Data
Excel not only allows you to protect the structure of your workbook but also provides an option to secure an entire worksheet. With this level of password protection, unauthorized entries or modifications in the worksheet can be effectively prevented. This measure ensures the accuracy and integrity of your data within each specific worksheet.
Step-by-Step Procedure to Protect an Excel Worksheet
To effectively shield your worksheet data from unapproved alterations, understanding how to set a worksheet protection password is vital. Let’s delve into each step of this simple process.
Step 1: Navigate to the ‘Review’ Tab
The first step in protecting your Excel worksheet involves navigating to the ‘Review’ tab. This tab is found on Excel’s main menu ribbon. Simply click on the ‘Review’ tab, and a new menu with various options will appear.
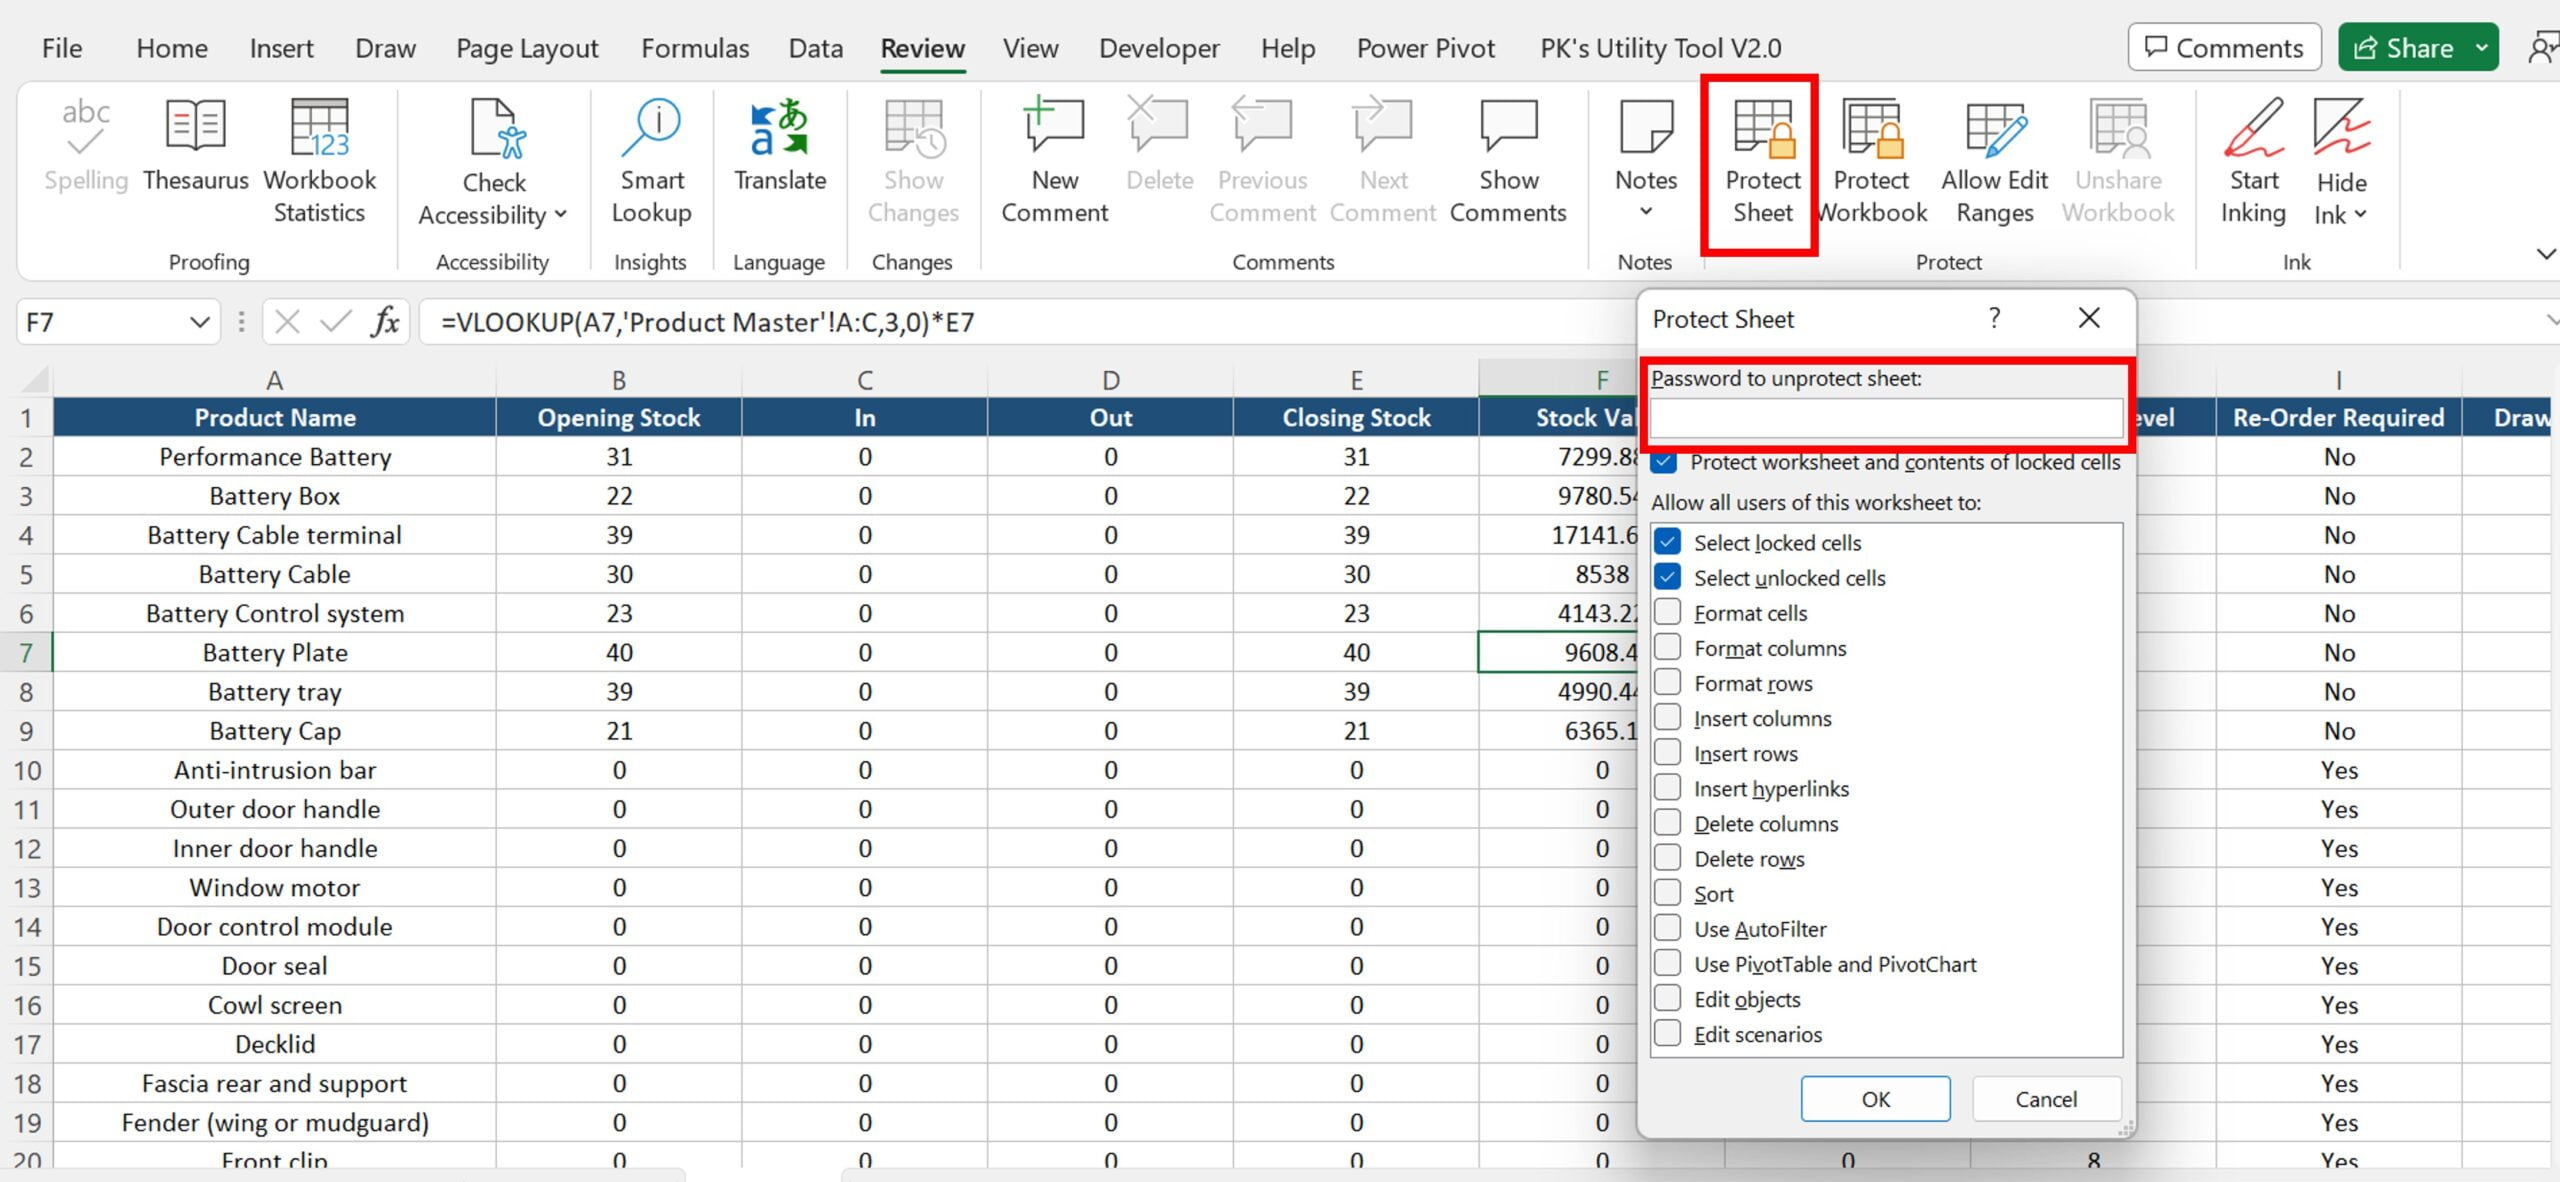
Step 2: Select ‘Protect Workbook’
Once you’re in the ‘Review’ tab menu, find the ‘Protect Workbook’ option. After locating this option, click on it. As a result, a dialog box will appear, prompting you to set a password for worksheet protection.
Step 3: Input Your Password
Finally, within the dialog box that appears, you’ll need to input your chosen password. This password will be required for anyone attempting to make changes to the worksheet.
As always, remember to choose a password that is both secure and memorable. Bear in mind that if this password is forgotten, Excel doesn’t offer a password recovery option, which could potentially lead to permanent worksheet protection.
After entering your password, click ‘OK’. You’ll then be asked to confirm your password by re-entering it in a new dialog box. Once you’ve reconfirmed your password, click ‘OK’.
In conclusion, setting a password to protect an Excel worksheet is an efficient and effective way to ensure the accuracy and integrity of your data. Whether you’re dealing with sensitive business data or personal data, this feature ensures your worksheet remains unaltered unless approved changes are made.
Protect Excel Cells: Focused Security
Excel’s versatility extends to allowing you to protect specific ranges in a worksheet. This provides targeted security for your data, safeguarding crucial data points within a larger dataset.
Detailed Steps to Protect a Desired Range in an Excel Worksheet
To secure specific cells or ranges within an Excel worksheet, it’s vital to understand the steps involved. Let’s walk through this straightforward process together.
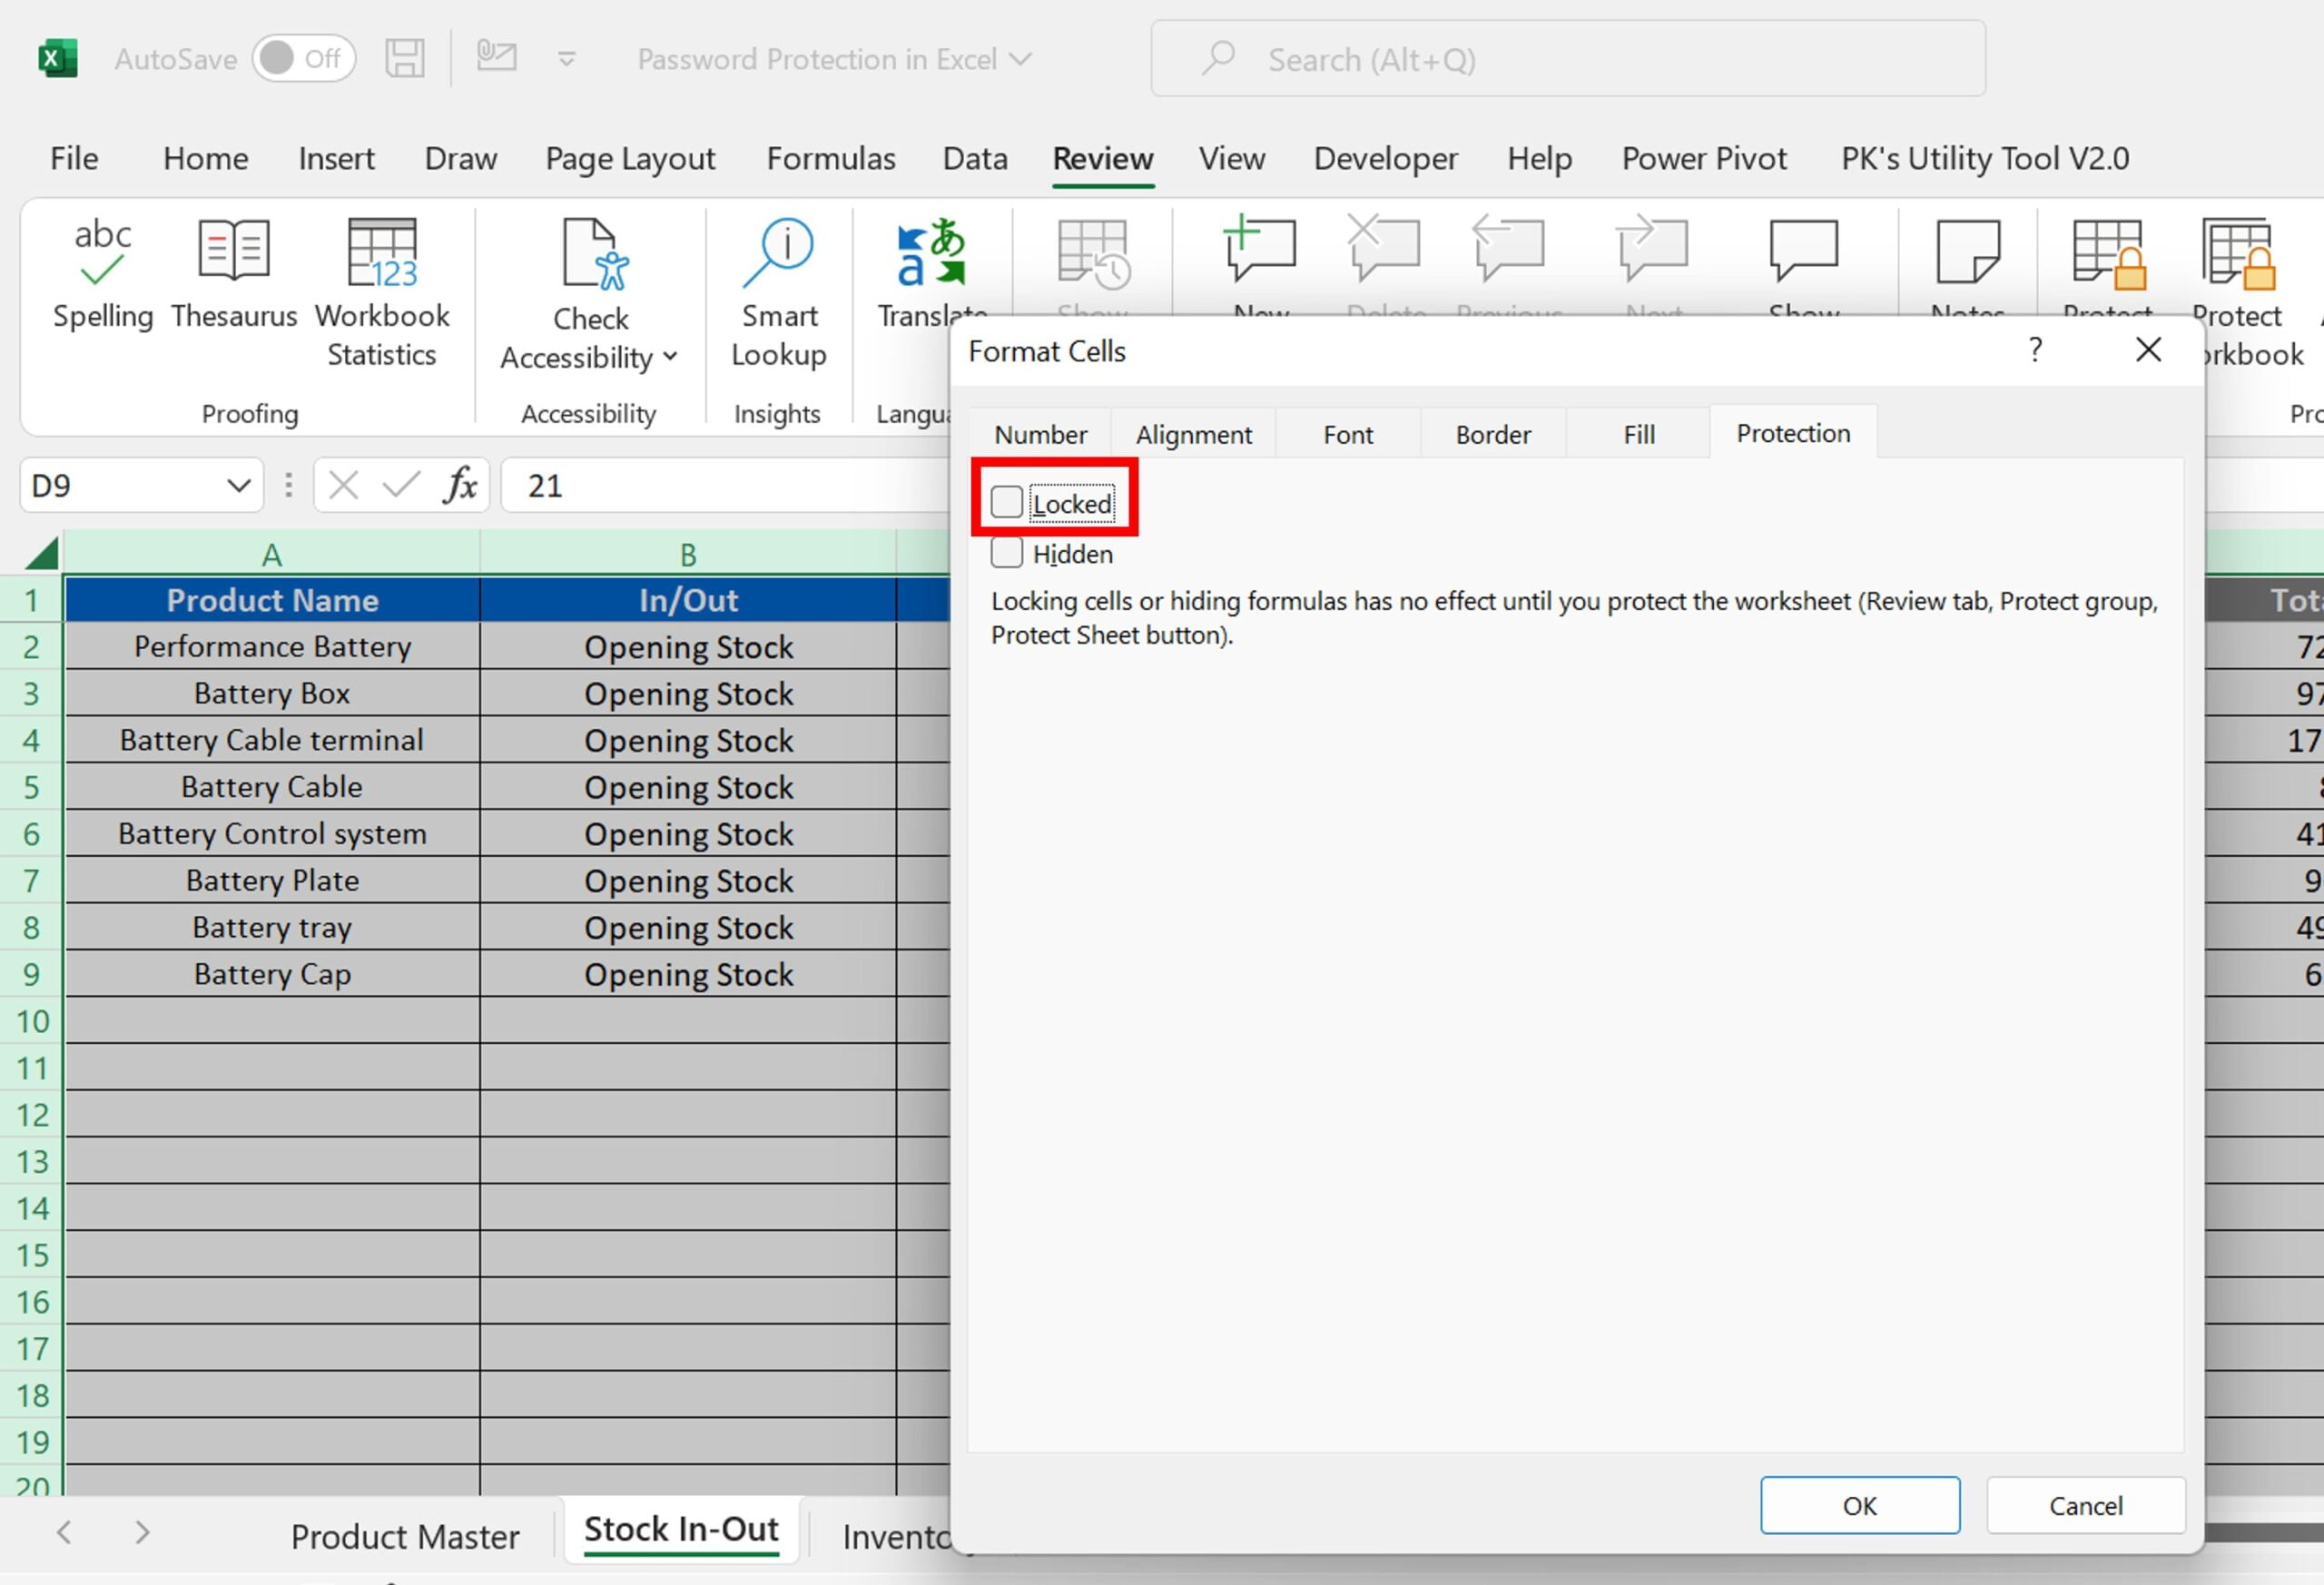
Step 1: Open the ‘Format Cells’ Window
The first step involves selecting the entire sheet. You can do this by clicking on the small square at the intersection of the row numbers and column letters. Following this, press Ctrl +1. This keyboard shortcut opens the ‘Format Cells’ window, where you’ll be able to change the locking settings for your cells.
Step 2: Unlock All Cells
Next, within the ‘Format Cells’ window, navigate to the ‘Protection’ tab. Here, you’ll find a checkbox labeled ‘Locked’. To unlock all cells, ensure this checkbox is unchecked. If it’s checked, click on it to uncheck.
Step 3: Lock Desired Range
Following the unlocking of all cells, you can now choose the range of cells you wish to lock. Select the desired range of cells on your worksheet, then press Ctrl +1 again to reopen the ‘Format Cells’ window.
In the ‘Protection’ tab, you’ll notice the ‘Locked’ checkbox. This time, click on it to check and apply the lock to the selected range.
Step 4: Protect Your Worksheet
Finally, to activate the protection of the locked cells, you need to protect the entire worksheet. To do this, navigate to the ‘Review’ tab, click on ‘Protect Workbook’, and input your chosen password in the dialog box that appears.
In conclusion, protecting specific ranges within an Excel worksheet is an effective method of focusing security where it’s most needed. Whether you’re securing sensitive business data points or personal information within a larger dataset, this feature ensures that your crucial data remains unaltered unless authorized changes are made.
VBA Project Protection: Safeguarding Your VBA Code
For those who use VBA (Visual Basic for Applications) code in their Excel workbook, there’s an additional layer of protection available. You can actually secure your VBA code with a password, shielding it from unauthorized access and modifications.
Step-by-Step Guide: How to Apply VBA Project Protection
Implementing protection for your VBA project involves a clear-cut process. Let’s break it down into easy-to-follow steps.
Step 1: Open the Visual Basic Editor
To kick things off, you need to open the Visual Basic Editor. This is where your VBA code resides. To do this, simply press Alt+F11. As a result, the Visual Basic Editor will open in a new window.
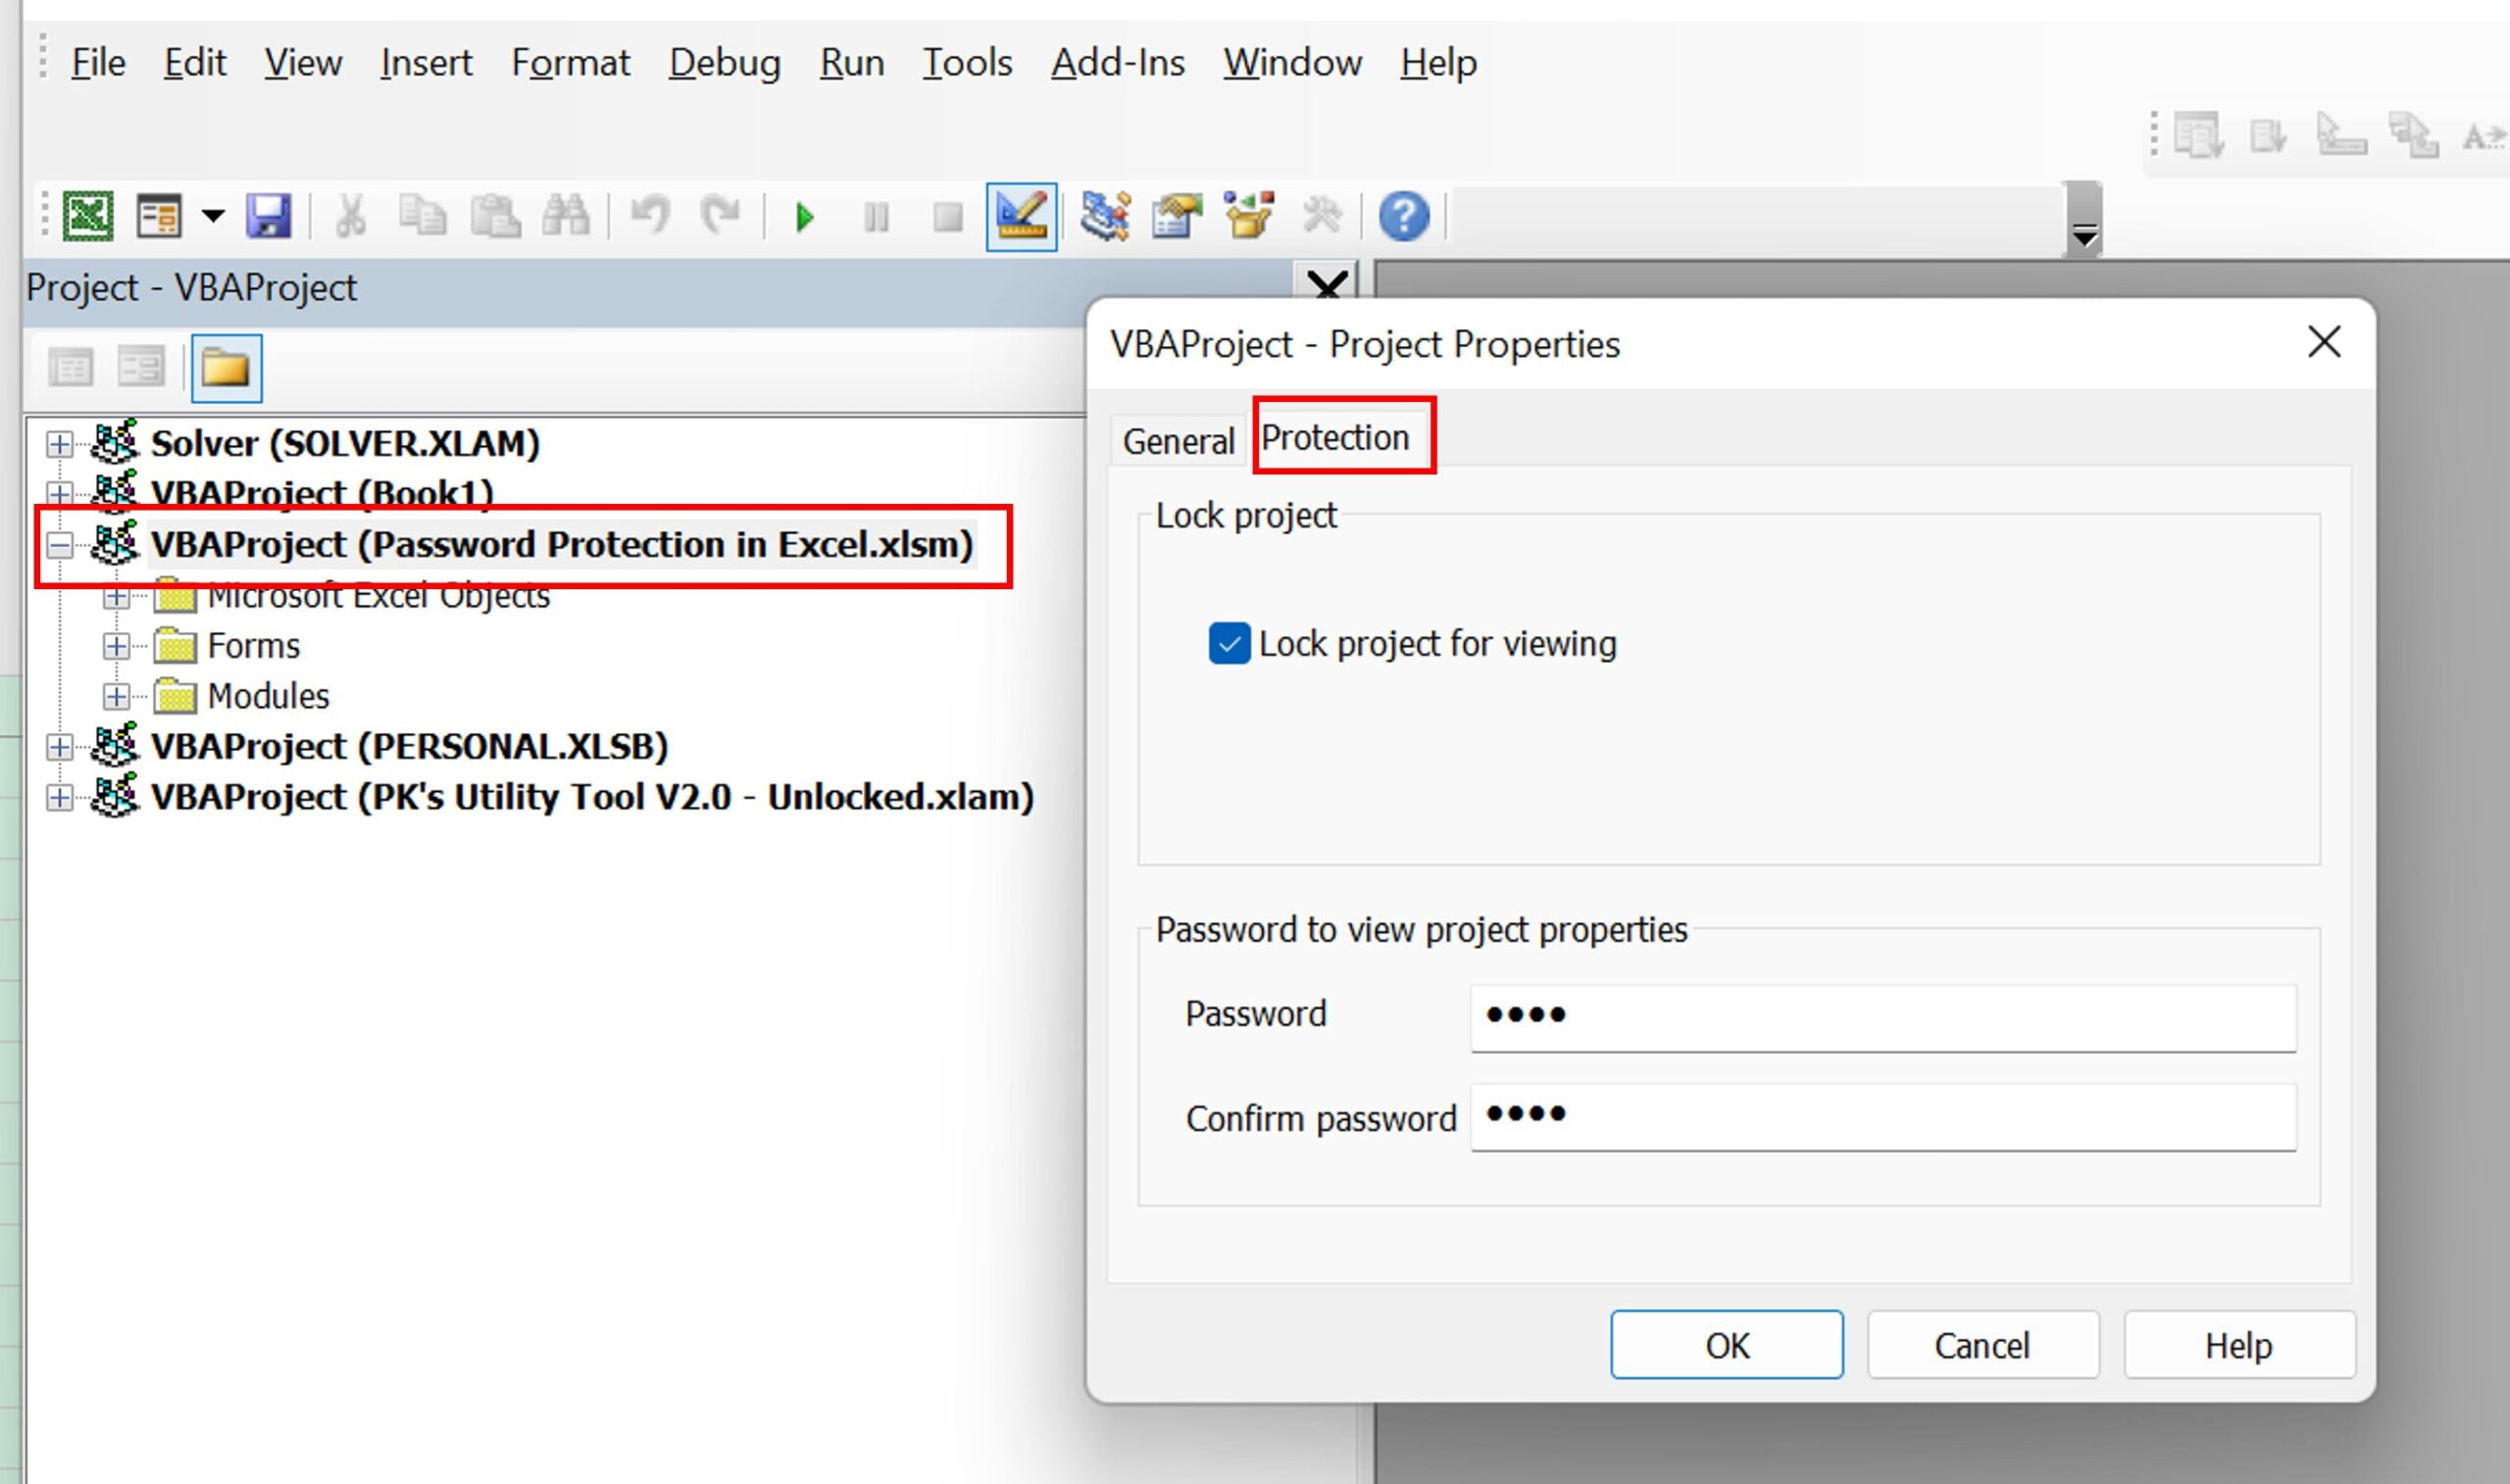
Step 2: Access VBA Project Properties
Once you’re in the Visual Basic Editor, find your VBA Project in the Project Explorer panel. This panel typically appears on the left side of the editor. After locating your VBA Project, right-click on it and select ‘VBAProject Properties’. Consequently, a new window will appear with various options.
Step 3: Initiate ‘Lock Project for Viewing’
Moving forward to the third step, you’ll find yourself in a freshly opened window. In this space, your next task is to smoothly navigate to the ‘Protection’ tab. Once you’re there, you’ll notice a checkbox that has been clearly labeled as ‘Lock project for viewing’. It’s essential at this juncture to check this box, as doing so will effectively activate the password protection for your VBA Project.
Step 4: Seal the Deal with Your Password
In the end, what remains is to input your carefully chosen password. This is a critical step, as this will be the password required to view the VBA code in the future. After diligently entering your password, you’ll be kindly prompted to confirm it. This confirmation is carried out by re-entering your password in a new dialog box that will promptly appear. Once you’ve successfully reconfirmed your password, simply click ‘OK’.
To wrap things up, the act of setting a password to shield your VBA Project is a potent strategy to ensure the unyielding security of your VBA code. Regardless of whether you’re deeply involved in crafting complex macros or you’re merely working with straightforward VBA scripts, this feature stands as an indispensable tool. It provides an extra layer of robust security, promising that your code remains confidential and unaltered, just as you intended.
Advantages of Password Protection in Excel
Excel password protection offers various benefits, including:
- Data Security: Excel’s password protection safeguards your sensitive data from unauthorized access or manipulation.
- Collaboration Control: With modification protection, you can share your work with others without worrying about unwanted changes. Users can view the data, but only those with the password can edit it.
- Targeted Protection: The ability to lock specific cells or ranges allows you to protect specific data within a larger dataset.
- Code Protection: If you’re using VBA scripts in your workbook, you can hide them from users to prevent unauthorized access or modification.
Opportunities for Improvement in Excel Password Protection
While Excel’s password protection mechanisms are robust, there are areas for potential enhancement:
- Password Recovery: Currently, if a user forgets a password, there’s no built-in method to recover it. A secure recovery option would be a beneficial addition.
- Password Strength Indicators: To further enhance security, Excel could implement a feature that rates the strength of the password the user is setting.
- Two-Factor Authentication: For an additional layer of security, integrating two-factor authentication could be considered.
Best Practices for Password Protection in Excel
When using password protection in Excel, consider the following best practices:
- Use Unique Passwords: Avoid using common or easily guessable passwords. Opt for a mix of alphanumeric characters and symbols.
- Change Passwords Regularly: To maintain high security, update your passwords regularly.
- Avoid Writing Down Passwords: Writing down passwords, especially in a place that is easily accessible, compromises your security measures.
- Leverage All Protection Levels: Depending on your needs, use a combination of workbook, worksheet, range, and VBA project protection.
Conclusion
Password protection in Excel provides a range of features to secure your data, from protecting an entire file to specific cells. By understanding these features and following best practices, you can ensure the integrity and confidentiality of your data.
Frequently Asked Questions
Q1: Can I protect specific cells in an Excel worksheet?
Yes, Excel allows you to protect specific cells or ranges within a worksheet. This feature is particularly useful when you want to protect specific data within a larger dataset.
Q2: Can I protect my VBA code in Excel?
Yes, Excel provides an option to protect your VBA code from unauthorized access or modification. You can set a password that will need to be entered to view the VBA code.
Q3: What happens if I forget my Excel password?
As of now, if you forget a password in Excel, there’s no built-in method to recover it. It’s essential to keep a secure record of your passwords.
Q4: Can I open an Excel file without a password?
If a password to open the file is set, you won’t be able to open the file without it. However, if a password to modify the file is set, you can open the file in ‘Read Only’ mode without the password.
Q5: Can I remove the password protection from an Excel file?
Yes, you can remove password protection by going to the same menu where you set the password and deleting the password from the respective field. Remember to save the file afterward.
Q6: How secure is Excel password protection?
Excel password protection offers a reliable level of security for everyday use. However, for highly sensitive data, additional measures like encrypted storage and secure sharing practices should be considered.
Q7: Can we use the same password to open and modify an Excel file?
Yes, you can use the same password for both actions. However, for optimal security, we recommend using different passwords.
Q8: Is there a way to bulk protect multiple Excel files?
Excel doesn’t provide a built-in feature to password protect multiple files at once. However, you can achieve this with VBA scripting or third-party tools.
Q9: Can other users see my password-protected Excel file?
While users can see the file, they won’t be able to open or modify it (depending on your password settings) without the correct password.
Q10: Can we open the password-protected Excel files in other spreadsheet programs?
Password-protected Excel files should retain their protection across different spreadsheet programs. However, compatibility may vary depending on the program used.
Visit our YouTube channel to learn step-by-step video tutorials
Watch the step-by-step video tutorial:
Click here to download the practice file


