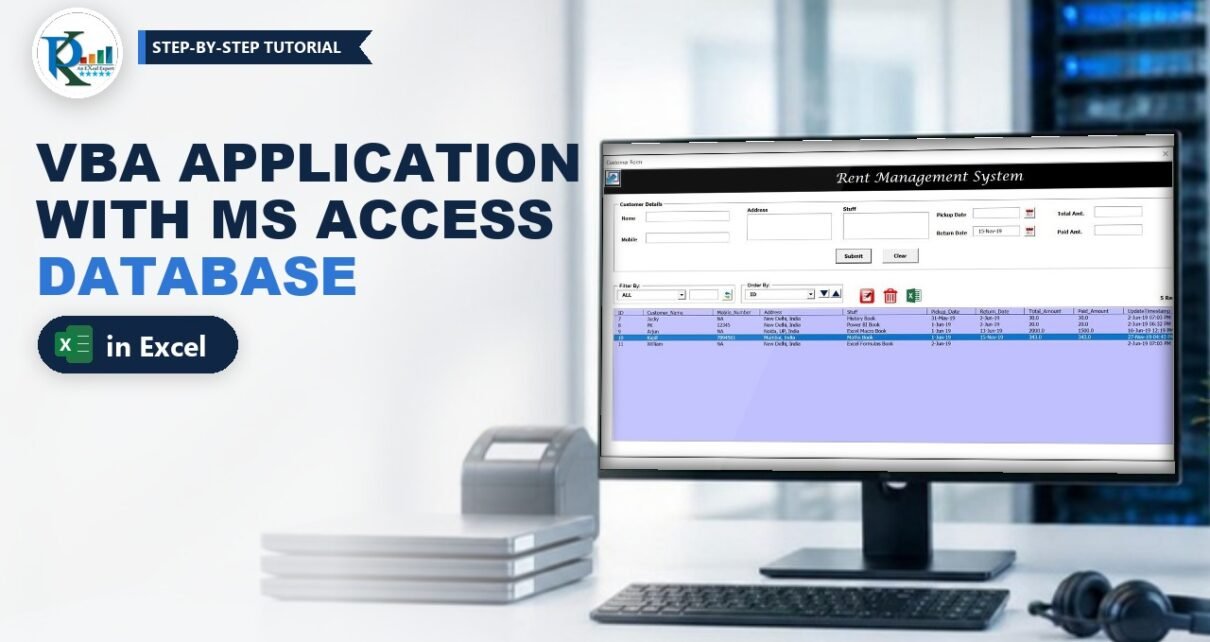
A VBA application with MS Access database storage gives you the best of both tools: a friendly Excel UserForm for data entry and a proper Access table that several people can use at the same time. In this tutorial you build PK’s Rent Management System from his two-part video: a full-screen form that adds, edits, deletes, filters, sorts and exports records, all through an ADODB connection. Every control name and code line below comes from the video.
Watch the Video Tutorial
Part 1: designing the database and the UserForm
Part 2: writing the VBA code
Part 1 creates the Access table and designs the form; Part 2 adds the code for the window buttons, list box, Submit, Edit, Sort, Delete and Export.
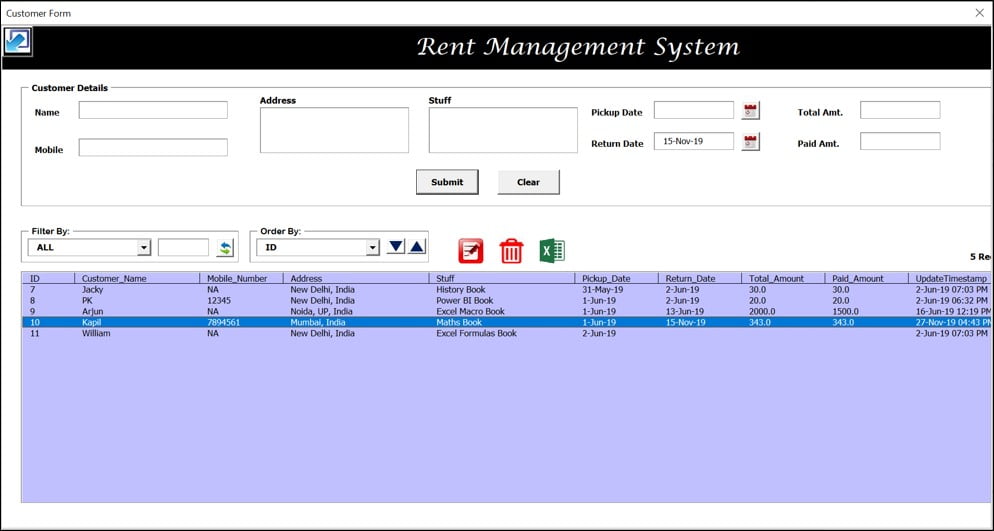
What You Will Build
- An Access table called
TBL_Customerthat stores every rental, with an automatic ID and timestamp. - A full-screen UserForm (
frm_Customer) with minimize and maximize buttons, so you can still work in Excel while the app runs. - Submit and Edit: one procedure that both adds new records and updates existing ones.
- Filter By and Order By: show pending returns, search any field and sort ascending or descending.
- Delete and Export to Excel, including deleting several selected records at once.
Part 1: Create the MS Access Database
Step 1: Make a project folder and a blank database
Create a folder for the application (PK calls it New Application). Open MS Access, choose Blank database, save it in that folder and name it Database. The workbook will live in the same folder, which is how the code finds the file later.
Step 2: Design the TBL_Customer table
Go to Create → Table Design and add these fields:
ID: AutoNumber, right-click and set it as the Primary Key.Customer_Name,Mobile_Number,Address,Stuff: Short Text. Mobile is text so users can type NA.Pickup_Date,Return_Date: Date/Time.Total_Amount,Paid_Amount: Number with Field Size Double. Delete the default value 0 so the field stays blank until the item is returned.UpdateTimeStamp: Date/Time. The code fills it whenever a record is added or changed.
Close the design view and save the table as TBL_Customer.
Part 2: Design the UserForm
Step 3: Prepare the workbook
Press Ctrl+N for a new workbook and add a second sheet named Support. The list box reads its data from this sheet. Save the file in the project folder as a macro-enabled (.xlsm) or binary (.xlsb) workbook, then open the Visual Basic Editor with Alt+F11.
Step 4: Insert the form and the header
Insert a UserForm and make it bigger. In the Properties window set (Name) to frm_Customer, Caption to Customer Form and BackColor to white. For the header, add an Image control with a black BackColor across the top, then a Label reading Rent Management System in Monotype Corsiva, size 28, centred, white font and a transparent BackStyle.
Step 5: Add the minimize and maximize buttons
Add two small command buttons, name them btn_Minimize and btn_Maximize, delete their captions, set BackStyle to transparent and load an icon into each one’s Picture property.
Step 6: Build the Customer Details frame
Add a Frame captioned Customer Details (bold, size 9). Inside it, add small transparent labels and these text boxes:
txt_CustomerName,txtMobileNumbertxt_AddressandtxtStuff, larger, with MultiLine set to TruetxtPickupandtxt_Return, each with a small command button showing a calendar picturetxt_TotalAmountandtxt_Paid_Amount
Below them add a Submit and a Clear button. Also add one more text box named txtid with Visible set to False. It is invisible to the user but remembers the ID of the record being edited.
Step 7: Add the Filter By and Sort By frames
Add a frame Filter By with ComboBox1, a search box TextBox1 and a refresh button. Add a second frame Sort By with ComboBox2 and two buttons with arrow pictures for ascending and descending order (fill in their ControlTipText so users see a hint).
Step 8: Add the action icons, list box and record count
Add three icon buttons named btn_Update_Existing, btn_Delete and btn_Export_to_Excel (PictureSizeMode stretch, BorderStyle none). Then draw a large ListBox1 with a light back colour and a label lbl_Record_count above its right corner.
Part 3: The VBA Code for the Access Database Application
First add the ADO reference: in the Visual Basic Editor go to Tools → References and tick Microsoft ActiveX Data Objects 2.8 Library.
Step 9: Fit the form to the window and fill the drop-downs
Private Sub UserForm_Initialize()

    Application.WindowState = xlMaximized
    Me.Top = 0
    Me.Left = 0
    Me.Height = Application.Height
    Me.Width = Application.Width

    Me.btn_Maximize.Visible = False
    Me.btn_Minimize.Visible = True

    'create drop down for filter by
    With Me.ComboBox1
        .AddItem "ALL"
        .AddItem "Return Pending"
        .AddItem "Customer_Name"
        .AddItem "Mobile_Number"
        .AddItem "Address"
        .AddItem "Stuff"
        .Value = "ALL"
    End With

    'create drop down for sort by
    With Me.ComboBox2
        .AddItem "ID"
        .AddItem "Customer_Name"
        .AddItem "Mobile_Number"
        .AddItem "Address"
        .AddItem "Stuff"
        .AddItem "Pickup_Date"
        .AddItem "Return_Date"
        .AddItem "Total_Amount"
        .AddItem "Paid_Amount"
        .Value = "ID"
    End With

End Sub
The drop-down items are the exact field names of the table. That is what lets the filter and sort code use the selected item directly in SQL and in a header lookup.
Step 10: Minimize and maximize
Private Sub btn_Maximize_Click()
    Me.Top = 0
    Me.Left = 0
    Me.Height = Application.Height
    Me.Width = Application.Width
    Me.btn_Maximize.Visible = False
    Me.btn_Minimize.Visible = True
End Sub

Private Sub btn_Minimize_Click()
    Me.Top = Application.Height - 100
    Me.Left = 0
    Me.Height = 50
    Me.Width = 50
    Me.btn_Maximize.Visible = True
    Me.btn_Minimize.Visible = False
End Sub
Minimize shrinks the form to a 50 x 50 tile near the bottom-left of the screen. Place both buttons on the same spot: only one is visible at a time.
Step 11: Load the records into the list box
This procedure is the heart of the app. Put it in the form’s code module:
Sub List_box_Data()

Dim sh As Worksheet
Set sh = ThisWorkbook.Sheets("Support")
sh.Cells.ClearContents

Dim cnn As New ADODB.Connection
Dim rst As New ADODB.Recordset
Dim qry As String, i As Integer
Dim n As Long

If Me.ComboBox1.Value = "ALL" Then
    qry = "SELECT * FROM TBL_Customer"
ElseIf Me.ComboBox1.Value = "Return Pending" Then
    qry = "SELECT * FROM TBL_Customer WHERE Return_Date IS NULL"
Else
    qry = "SELECT * FROM TBL_Customer WHERE " & Me.ComboBox1.Value & " LIKE '%" & Me.TextBox1.Value & "%'"
End If

cnn.Open "Provider=Microsoft.ACE.OLEDB.12.0;Data Source=" & ThisWorkbook.Path & "\Database.accdb"
rst.Open qry, cnn, adOpenKeyset, adLockOptimistic

sh.Range("A2").CopyFromRecordset rst
For i = 1 To rst.Fields.Count
    sh.Cells(1, i).Value = rst.Fields(i - 1).Name
Next i

rst.Close
cnn.Close

sh.Range("A:A").NumberFormat = "0"
sh.Range("F:G").NumberFormat = "D-MMM-YY"
sh.Range("H:I").NumberFormat = "0.0"
sh.Range("J:J").NumberFormat = "D-MMM-YY HH:MM AM/PM"

With Me.ListBox1
    .ColumnCount = 10
    .ColumnHeads = True
    .ColumnWidths = "50,120,80,140,140,80,80,80,80,90"
    n = sh.Range("A" & Application.Rows.Count).End(xlUp).Row
    If n > 1 Then
        .RowSource = "Support!A2:J" & n
    Else
        .RowSource = "Support!A2:J2"
    End If
End With

If (n - 1) < 2 Then
    Me.lbl_Record_count.Caption = (n - 1) & " Record"
Else
    Me.lbl_Record_count.Caption = (n - 1) & " Records"
End If

End Sub
How the list box code works
- The query follows the Filter By box. ALL reads every row, Return Pending keeps rows where
Return_Dateis empty, and any field name builds aLIKE '%text%'search, so typing PK finds every name that contains PK. - The connection is dynamic.
ThisWorkbook.Pathpoints to the workbook’s own folder, so the app keeps working when you move or share the whole folder. - CopyFromRecordset pastes the data from A2 but not the headers, so the loop writes the field names into row 1. Fields count from 0, hence
i - 1. - RowSource with ColumnHeads shows row 1 as list headers. If only the header exists, the list still points at row 2 so it shows an empty list instead of an error.
Link the refresh button to it with Call List_box_Data, and call it at the end of UserForm_Initialize as well, so the records appear as soon as the form opens. For the cursor and lock types, the ADODB connection chapter of the VBA course explains every option.
Step 12: Pick dates with the calendar
PK uses his own calendar form, imported into the project. Each calendar button passes its text box to it:
Private Sub CommandButton1_Click()
    Call Calendar.SelectedDate(Me.txtPickup)
End Sub

Private Sub CommandButton2_Click()
    Call Calendar.SelectedDate(Me.txt_Return)
End Sub
You can build or download that form in the dynamic calendar control for VBA UserForms tutorial.
Step 13: Submit: add or update a record
The Submit button first validates the boxes. In the video it checks that the customer name, mobile number, address and stuff are filled, that the pickup date passes IsDate, and that the optional return date and amounts pass IsDate and IsNumeric when they are filled. Each check shows a vbCritical message and exits. Then it saves:
Dim cnn As New ADODB.Connection
Dim rst As New ADODB.Recordset
Dim qry As String

cnn.Open "Provider=Microsoft.ACE.OLEDB.12.0;Data Source=" & ThisWorkbook.Path & "\Database.accdb"

If Me.txtid.Value <> "" Then
    qry = "SELECT * FROM TBL_Customer WHERE ID = " & Me.txtid.Value
Else
    qry = "SELECT * FROM TBL_Customer WHERE ID = 0"
End If

rst.Open qry, cnn, adOpenKeyset, adLockOptimistic

If rst.RecordCount = 0 Then
    rst.AddNew
End If

rst.Fields("Customer_Name").Value = Me.txt_CustomerName.Value
rst.Fields("Mobile_Number").Value = Me.txtMobileNumber.Value
rst.Fields("Address").Value = Me.txt_Address.Value
rst.Fields("Stuff").Value = Me.txtStuff.Value
rst.Fields("Pickup_Date").Value = VBA.CDate(Me.txtPickup.Value)

If Me.txt_Return.Value <> "" Then rst.Fields("Return_Date").Value = VBA.CDate(Me.txt_Return.Value)
If Me.txt_TotalAmount.Value <> "" Then rst.Fields("Total_Amount").Value = Me.txt_TotalAmount.Value
If Me.txt_Paid_Amount.Value <> "" Then rst.Fields("Paid_Amount").Value = Me.txt_Paid_Amount.Value
rst.Fields("UpdateTimestamp").Value = VBA.Now

rst.Update

rst.Close
cnn.Close

MsgBox "Updated Successfully", vbInformation
Call Me.List_box_Data
This one procedure handles both cases. When txtid is empty, the query asks for ID 0, which never exists (AutoNumber starts at 1), so RecordCount is 0 and AddNew creates a new row. When txtid holds an ID, the query returns that row and the same field assignments overwrite it. CDate turns the date text into a real date, and rst.Update writes the change to Access. In the video the boxes are emptied right after rst.Update, the same way the Clear button does it.
Step 14: Clear, Edit and double-click
The Clear button simply sets every box, including txtid, to "". The Edit button copies the selected list row back into the boxes:
Private Sub btn_Update_Existing_Click()
If Me.ListBox1.ListIndex > -1 Then
    Me.txtid.Value = Me.ListBox1.List(Me.ListBox1.ListIndex, 0)
    Me.txt_CustomerName.Value = Me.ListBox1.List(Me.ListBox1.ListIndex, 1)
    Me.txtMobileNumber.Value = Me.ListBox1.List(Me.ListBox1.ListIndex, 2)
    Me.txt_Address.Value = Me.ListBox1.List(Me.ListBox1.ListIndex, 3)
    Me.txtStuff.Value = Me.ListBox1.List(Me.ListBox1.ListIndex, 4)
    Me.txtPickup.Value = VBA.Format(Me.ListBox1.List(Me.ListBox1.ListIndex, 5), "D-MMM-YY")
    Me.txt_Return.Value = VBA.Format(Me.ListBox1.List(Me.ListBox1.ListIndex, 6), "D-MMM-YY")
    Me.txt_TotalAmount.Value = Me.ListBox1.List(Me.ListBox1.ListIndex, 7)
    Me.txt_Paid_Amount.Value = Me.ListBox1.List(Me.ListBox1.ListIndex, 8)
End If
End Sub
ListIndex is -1 when nothing is selected, and list columns count from 0, so column 0 is the ID. Paste the same lines into the list box’s DblClick event so a double-click also opens a record for editing. Note: in the video’s code columns 7 and 8 are assigned the other way round; the version above matches the table order (Total_Amount, then Paid_Amount).
Step 15: Sort ascending and descending
Private Sub CommandButton4_Click()
Dim sh As Worksheet
Dim n As Integer
Set sh = ThisWorkbook.Sheets("Support")
n = Application.WorksheetFunction.Match(Me.ComboBox2.Value, sh.Range("1:1"), 0)
sh.UsedRange.Sort key1:=sh.Cells(1, n), order1:=xlAscending, Header:=xlYes
End Sub
MATCH finds the column of the selected field name in the header row of the Support sheet, and the sort key uses that column. Because the list box reads the Support sheet through RowSource, it shows the new order immediately. Copy the procedure to the second arrow button and change xlAscending to xlDescending.
Step 16: Delete one or many records
Private Sub btn_Delete_Click()
If Me.ListBox1.ListIndex = -1 Then
    MsgBox "Please select record(s) to delete", vbCritical
    Exit Sub
End If

Dim confirmation As Integer
confirmation = MsgBox("Do you want to delete selected record(s)?", vbQuestion + vbYesNo)
If confirmation = vbNo Then Exit Sub

Dim i As Long
Dim cnn As New ADODB.Connection
Dim rst As New ADODB.Recordset
Dim qry As String

cnn.Open "Provider=Microsoft.ACE.OLEDB.12.0;Data Source=" & ThisWorkbook.Path & "\Database.accdb"

For i = 0 To Me.ListBox1.ListCount - 1
    If Me.ListBox1.Selected(i) = True Then
        qry = "Delete FROM TBL_Customer WHERE ID = " & Me.ListBox1.List(i, 0)
        rst.Open qry, cnn, adOpenKeyset, adLockOptimistic
    End If
Next i

cnn.Close
MsgBox "Deleted Successfully", vbInformation
Call Me.List_box_Data
End Sub
The loop checks every row and runs a DELETE query for each selected one. To select several rows with the mouse, set the list box’s MultiSelect property to 2 – fmMultiSelectExtended.
Step 17: Export to Excel
Private Sub btn_Export_to_Excel_Click()
Dim sh As Worksheet
Set sh = ThisWorkbook.Sheets("Support")
Dim nwb As Workbook
Dim nsh As Worksheet
Set nwb = Workbooks.Add
Set nsh = nwb.Sheets(1)
sh.UsedRange.Copy nsh.Range("A1")
End Sub
Whatever the list shows, filtered and sorted, lands in a new workbook.
Common Errors and Fixes
Additions from general VBA and Access practice; not covered in the video, except where noted.
User-defined type not defined
The Microsoft ActiveX Data Objects reference is missing. Add it under Tools → References (2.8 or a newer 6.x version).
The database is locked or the code fails while Access is open
PK hits this in the video: the table was still open in Design View. Close the table in Access before running the form.
A name with an apostrophe breaks the filter
The filter builds SQL by joining text, so a value like D’Souza ends the string early. Double any single quote with Replace(Me.TextBox1.Value, "'", "''"), or move to a parameterised ADODB.Command.
Tips for a Multi-User Setup
- Put the whole folder (workbook plus database) on a shared drive; every user opens their own copy of the workbook and they all write to one .accdb file.
- Back up the .accdb regularly and use Compact and Repair in Access to keep it small.
- Microsoft documents the recordset in the ADO Recordset object reference.
Want It Ready-Made?
If you would rather start from the finished file, the VBA Application with MS Access Database on NextGenTemplates.com includes the designed form, the Access database and all the code from this tutorial. For more ready-to-use applications and utilities, browse the Excel VBA tools collection.
Related Tutorials
- Add a login form connected to an Access user table
- VBA ADODB Connection: Connect Excel to Access and SQL Databases
- Fully Functional Dynamic Calendar Control in VBA
- Data Entry Form with Picture Box in Excel VBA
- Excel VBA Course: From Macro Recording to ADODB
Frequently Asked Questions
Why store the data in MS Access instead of an Excel sheet?
Access is built for records. Several users can add and edit rows in one database at the same time, which a shared Excel sheet handles poorly, and the Excel file stays small because it only shows the data.
Can multiple users use this VBA application at the same time?
Yes. Keep the workbook and the database together in a shared folder; each user opens the workbook and all changes go to the same Access file through ADODB.
How does one Submit button both add and update records?
A hidden text box holds the ID of the record being edited. If it is empty the code looks for ID 0, finds nothing and adds a new row; if it holds an ID, the code opens that row and overwrites it.
Do I need MS Access installed on every computer?
No. Users only need the Microsoft Access Database Engine (the ACE provider), which is included with many Office installations and is also a free download from Microsoft. Access itself is only needed to design or repair the table.
About the Author
PK is a Microsoft Excel expert and trainer and the founder of PK: An Excel Expert and NextGenTemplates.com. He has been teaching Excel, VBA, Power Query and Power BI since 2016 on his YouTube channel.
Conclusion
You have now built a complete VBA application with MS Access database storage: an Access table, a full-screen UserForm with minimize and maximize, one Submit routine that adds and updates, plus filter, sort, multi-row delete and export. Swap the fields for your own business and the same pattern runs any register, from rentals to inventory.