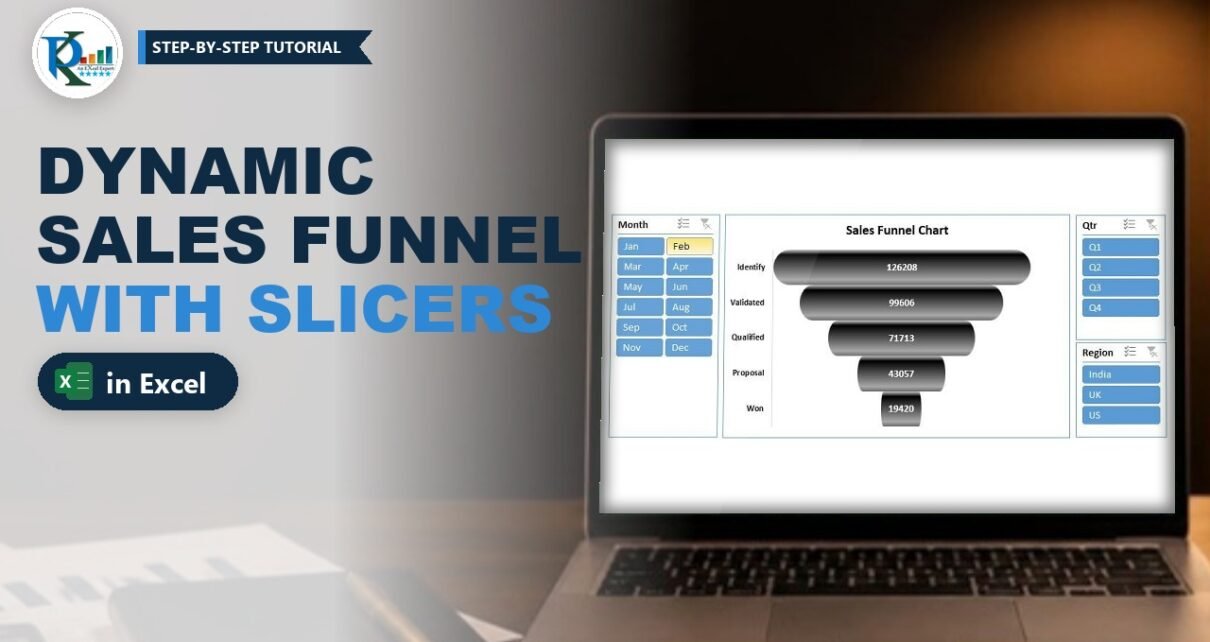
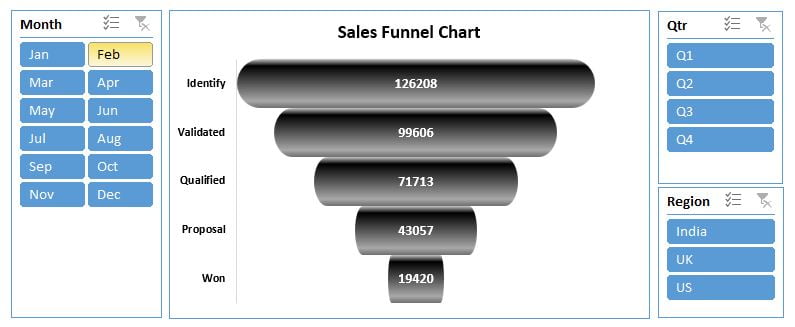
A sales funnel chart in Excel shows how many deals move from one stage to the next, from the first identified lead down to the deals you won. In this tutorial you build a dynamic version: a pivot table summarises the stages, three small helper columns turn the numbers into a centred funnel, a stacked bar chart draws it, and Month, Qtr and Region slicers let you filter it with one click. The bars get a rounded 3D gradient look and sit on a clean dashboard sheet.
Watch the Video Tutorial
In the video, PK builds the chart from the raw data: pivot table, helper columns, stacked bar chart, gradient bars and three slicers.
What You Will Build
- A pivot table that totals the five sales stages: Identify, Validated, Qualified, Proposal and Won.
- Three helper columns (Sale Stage, Count and Space) that centre each bar.
- A stacked bar chart with a hidden Space series, so the bars form a funnel.
- Rounded 3D-style bars made from a gradient-filled shape, with white data labels.
- Month, Qtr and Region slicers that update the funnel instantly.
The Data Behind the Sales Funnel
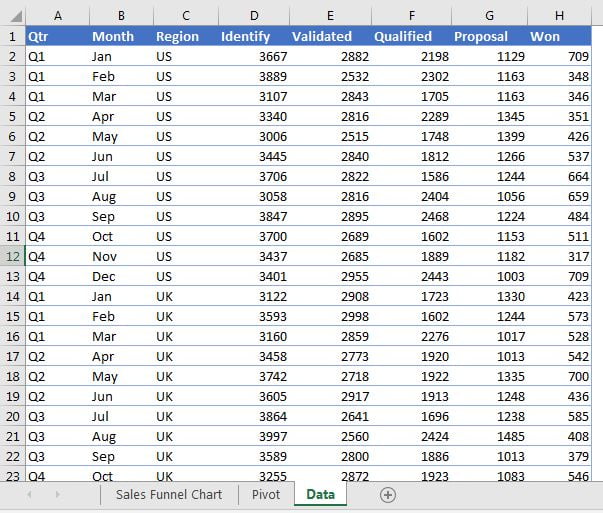
The data sheet has one row per month and region. Columns A to C hold Qtr, Month and Region, and columns D to H hold the number of deals at each stage: Identify, Validated, Qualified, Proposal and Won.
Part 1: Summarise the Stages with a Pivot Table
Step 1: Insert the pivot table
Click inside the data and go to Insert > PivotTable, then click OK to place it on a new sheet. Rename that sheet Pivot.
Step 2: Add the five stages and turn them vertical
Tick Identify, Validated, Qualified, Proposal and Won in that order. Excel places them side by side as Sum of Identify, Sum of Validated and so on. In the field list, drag Σ Values from the Columns area to the Rows area. Now the five totals sit in a single column, with the labels in A4:A8 and the values in B4:B8.
Step 3: Remove “Sum of” from the labels
Select the pivot and press Ctrl + H. Find Sum of, leave Replace with empty and click Replace All. The labels now read Identify, Validated, Qualified, Proposal and Won, but each one still starts with a space, which the next step cleans up.
Part 2: Build the Funnel Helper Columns
Next to the pivot, add three headers in E3:G3: Sale Stage, Count and Space. Enter the formulas below in row 4 and fill them down to row 8.
Step 4: Sale Stage
=TRIM(A4)TRIM removes the leading space that was left after Find and Replace, so the chart labels line up neatly.
Step 5: Count
=B4This links straight to the pivot value. When a slicer filters the pivot, these cells change and the chart follows.
Step 6: Space
=(MAX($F$4:$F$8)-F4)/2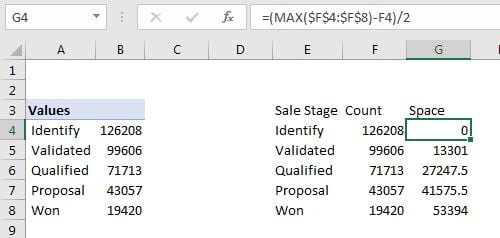
How the Space formula works
MAX($F$4:$F$8)finds the widest bar, which is the Identify count (126,208). The dollar signs (press F4) lock the range when you fill the formula down.- Subtracting the stage count gives the empty width that stage needs to match the widest bar: 0 for Identify and 106,788 for Won.
- Dividing by 2 puts half of that gap on the left. The other half is simply empty space on the right, so every bar ends up centred, which is what makes the funnel shape.
In the video PK puts the helper columns one column further left (D:F), so the formula there reads =(MAX($E$4:$E$8)-E4)/2. Use whichever columns you like, as long as the formula points at the Count column.
Part 3: Create the Sales Funnel Chart in Excel
Step 7: Insert a stacked bar chart
Select the three helper columns E3:G8 and go to Insert > Bar Chart > 2-D Stacked Bar.
Step 8: Move the Space series to the left
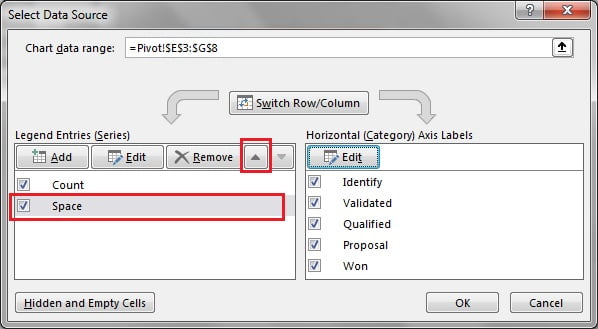
Right-click the chart and choose Select Data. Select Space in the Legend Entries (Series) list and click the Move Up arrow, then OK. Space is now drawn first, on the left of each bar.
Step 9: Hide the Space series
Click the Space bars, go to Format > Shape Fill > No Fill. The Count bars now float in the middle and already look like a funnel.
Step 10: Put the stages in the right order
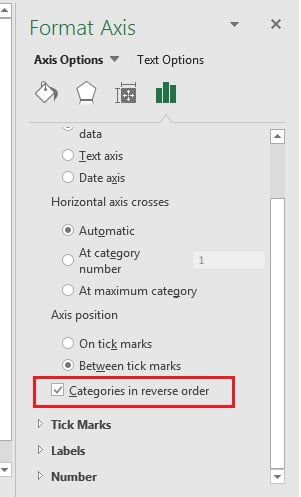
A bar chart plots the first category at the bottom. Right-click the vertical axis, choose Format Axis and tick Categories in reverse order. Identify moves to the top and Won to the bottom.
Step 11: Clean up the chart
Select the horizontal axis, the gridlines and the legend one by one and press Delete. Then right-click a bar, choose Format Data Series and set the Gap Width to 0% so the stages touch each other.
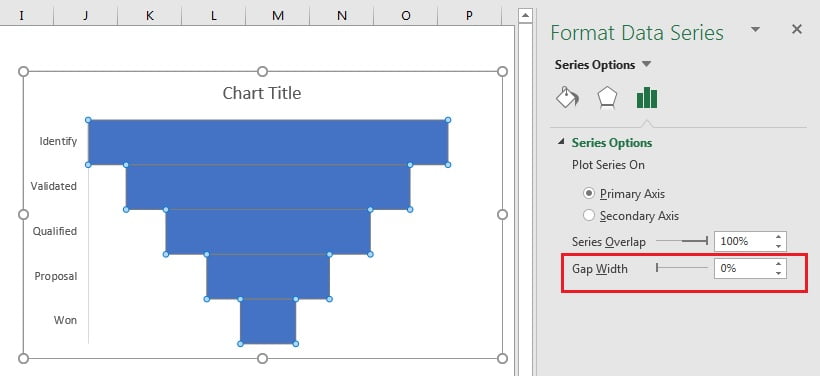
For a simple funnel you can stop here and pick a shape style from the Format tab. The next part gives the bars a rounded 3D look.
Part 4: Give the Funnel Rounded 3D Bars
Step 12: Draw a rounded rectangle
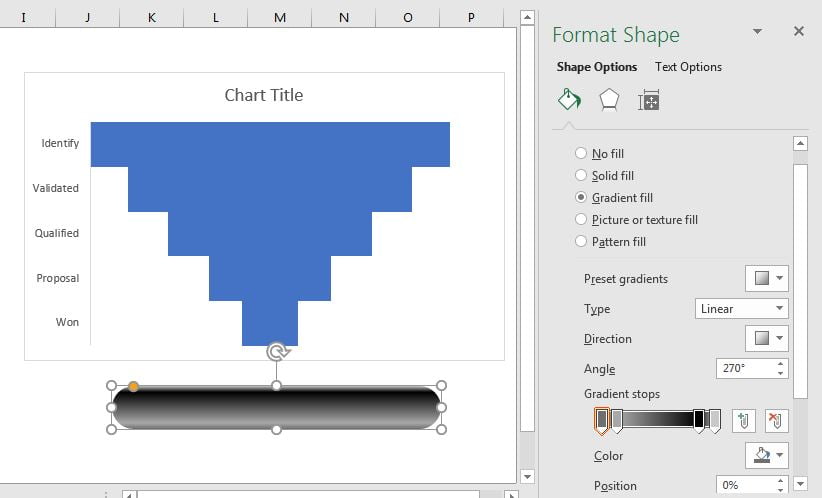
Go to Insert > Shapes > Rectangle: Rounded Corners and draw a wide, flat bar. Drag the small yellow handle all the way to the right so the ends are fully rounded, and set Shape Outline to No Outline.
Step 13: Add a gradient fill
Right-click the shape, choose Format Shape > Fill > Gradient fill. PK starts from the preset Medium Gradient – Accent 3, keeps the type Linear with an angle of 270°, moves the stops and adds a black stop, so the bar is dark at the edges and light in the middle, like a metal tube.
Step 14: Paste the shape into the bars
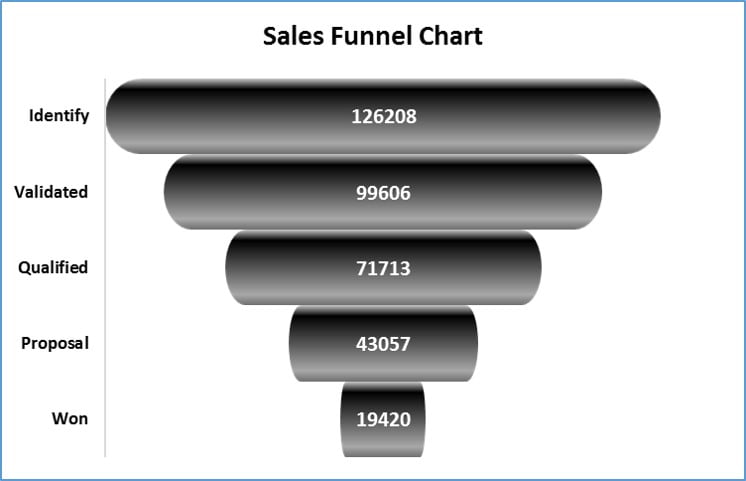
Copy the shape (Ctrl + C), click once on the Count bars to select the whole series and press Ctrl + V. Every stage now uses the rounded gradient bar. If a thin border shows, select the series and set Shape Outline to No Outline.
Step 15: Add labels and format the axis
Right-click the bars and choose Add Data Labels. Make the labels white, bold and slightly bigger so they stand out on the dark bars. Make the vertical axis labels black and bold, and type your chart title, for example Sales Funnel Chart.
Part 5: Make the Funnel Dynamic with Slicers
Step 16: Move the chart to a dashboard sheet
Add a new sheet and name it Dashboard. On the Pivot sheet select the chart, press Ctrl + X, go to Dashboard and press Ctrl + V. Turn off gridlines with View > Gridlines and give the chart a coloured outline if you like.
Step 17: Insert the slicers
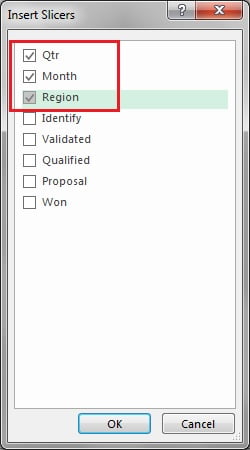
Click anywhere in the pivot table and go to PivotTable Analyze (called Analyze in Excel 2013 and 2016) > Insert Slicer. Tick Qtr, Month and Region and click OK.
Step 18: Move and arrange the slicers
Ctrl-click all three slicers, cut them with Ctrl + X and paste them on the Dashboard, Month on the left and Qtr and Region on the right. To show the months in two columns, select the Month slicer and set Slicer > Columns to 2. Pick a slicer style that matches your chart.
How the dynamic link works
A slicer filters the pivot table. The Count cells point at the pivot values with simple =B4 links, so they change, the Space formula recalculates, and the chart redraws.
Modern Excel Alternative: The Built-in Funnel Chart
This section is an addition and is not in the original video or post. Excel 2019 and Microsoft 365 have a native funnel chart under Insert > Waterfall, Funnel, Stock, Surface or Radar > Funnel. It centres the bars for you. It can’t be a pivot chart, but if you build it from the Sale Stage and Count helper columns (E3:F8), the slicers still drive it through those linked cells. The stacked bar method works in every Excel version and gives you full control over the bar shape.
Common Errors and Fixes
The funnel is upside down
Categories in reverse order is not ticked. Format the vertical axis and tick it (Step 10).
The bars are not centred
The Space series is on the right or its formula is wrong. Move Space up in Select Data and check that the MAX range is locked with dollar signs.
The slicers don’t change the chart
The Count column holds typed numbers instead of links to the pivot. Use plain cell links such as =B4. If Excel writes a GETPIVOTDATA formula when you click a pivot cell, that formula also updates with the slicers.
Tips
- Keep the pivot and helper columns on their own sheet and show only the chart and slicers.
- Microsoft explains how to use slicers to filter data on Microsoft Support.
Want It Ready-Made?
If you would rather start from the finished workbook shown in this tutorial, the Dynamic Sales Funnel Chart with Slicers is available on NextGenTemplates.com, together with more Excel chart templates. To build pivot tables, slicers and dashboards like this on your own, the Excel Pivot Tables and Dashboards course walks you through it step by step.
Related Tutorials
- Sales Funnel Infographic Chart in Excel
- Slicers in a Pivot Table: Insert, Connect and Arrange
- Custom Slicer Style in Excel
- Stylish Pivot Chart with Slicer in Excel
- Excel Dashboard Templates and Tutorials
Frequently Asked Questions
How do I make a funnel chart in Excel without the Funnel chart type?
Use a stacked bar chart with two series: a hidden Space series on the left and the actual Count series. Space is the difference between the largest count and each count, divided by 2, which centres every bar.
Why do we divide the Space by 2?
The gap between a stage and the widest stage has to be split equally on both sides of the bar. Half goes into the hidden Space series on the left and the other half stays as empty space on the right.
How do slicers control a normal chart?
The slicers filter the pivot table, and the chart data cells are linked to the pivot values. When the pivot changes, the linked cells and the chart update automatically.
How do I get rounded 3D bars in an Excel chart?
Draw a rounded rectangle, give it a linear gradient fill with a dark colour at the edges, copy it, select the bar series and paste. The shape replaces the plain fill of every bar.
About the Author
PK is a Microsoft Excel expert and trainer and the founder of PK: An Excel Expert and NextGenTemplates.com. He has been teaching Excel, VBA, Power Query and Power BI since 2016 on his YouTube channel.
Conclusion
A dynamic sales funnel chart in Excel needs only a pivot table, three helper columns and a stacked bar chart. The TRIM, link and Space formulas centre the bars, reverse order and a 0% gap width give the funnel its shape, a gradient rounded rectangle adds the 3D finish, and slicers for Month, Qtr and Region make it interactive. Build it once and reuse it in every sales dashboard and presentation.